Choosing the “right” kit to scrap a particular photograph can sometimes be a challenge. The theme of the kit might be perfect for you, but the colors of the kit might not be what you need. There’s an easy way to fix that! Create a custom color palette from your photograph, and recolor the kit elements as needed.
Let’s look at creating our own color palette today, and we’ll talk about recoloring elements next week.
I am using CS6 for this tutorial. The great news is that this technique works exactly the same in Adobe Photoshop Elements. I tested it in PSE 9, 11 and 12 (I don’t have version 10); but it makes sense that this method would work in other PSE versions as well.
I started creating a new kit last week, and wanted a colorful Spring color palette. I remember being charmed by a colorful Spring garden I saw in Paris. Although my photograph of the garden is far from fabulous, I wanted to use those colors in my color palette.

Here are the steps to follow to create your own custom color palette from your own photograph:
Duplicate your photo, and close your original, keeping it safe.
Go the the top Menu Bar and choose Image > Mode > Indexed Color.
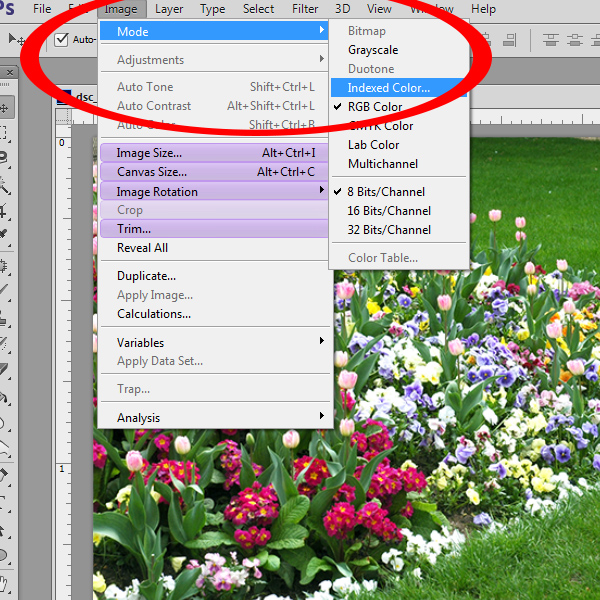
The Indexed Color window will open and you will have some options to choose from:
For Palette: Choose Local (Perceptual) (accessed by clicking on the down-pointing arrow to the right)
For Colors: Choose as many colors as you would like to have created for you. I chose 10.
For Forced: Choose None.
For Transparency: Check this box.
For Dither: Choose None.
Click Okay.
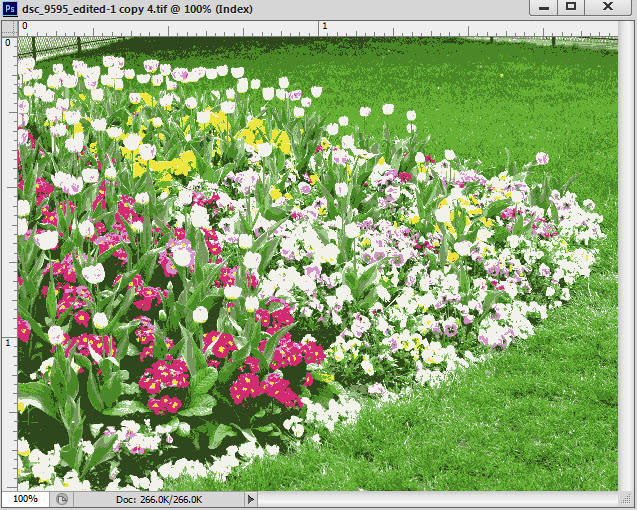
You will see some chances occur very quickly in your photograph. Your photo will appear very flat.
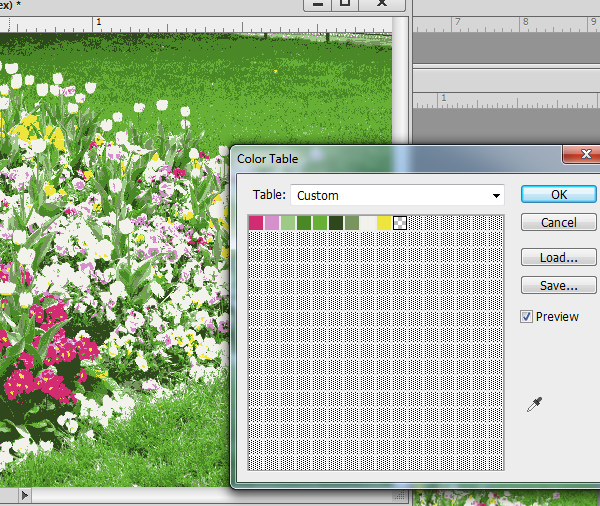
Next go back to the top Menu bar and choose: Image > Mode > Color Table to see your custom color palette.
Notice that there are 10 color slots (since I chose to use 10 colors); however, the #10 slot is empty. That is because Photoshop found only 9 colors in my photograph.
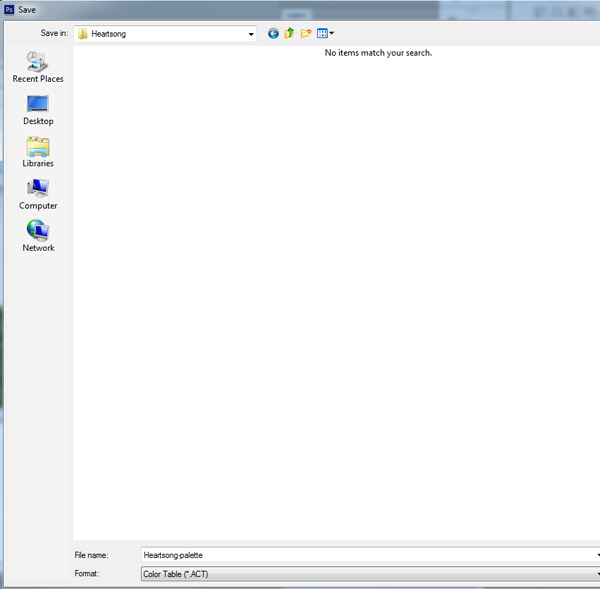
Now that you have created your color palette, let’s save it. Click on Save. When the Save dialogue box opens, give your new color palette a name and choose where you would like to save it. The file will be saved as an .ACT file. I chose to save my swatch in my Heartsong folder, and I named it Heartsong-palette.
When you ready to use your palette, you will need to Load the .ACT file in the Color Swatches panel. This is how you do that:
Click on the down-pointing arrow that is on the far right corner of the Swatches Panel, then click on Load Swatches.
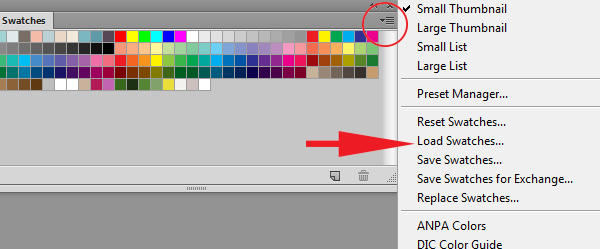
Change the File Type to ACT, navigate to where you saved your .ACT file, select it, then click Load.
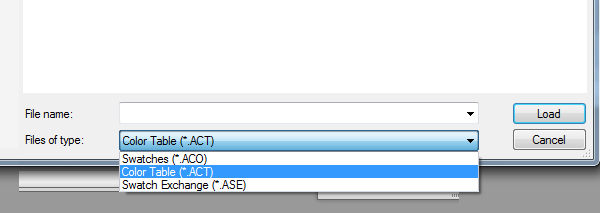
Your new palette will now be visible in your Swatches Panel.
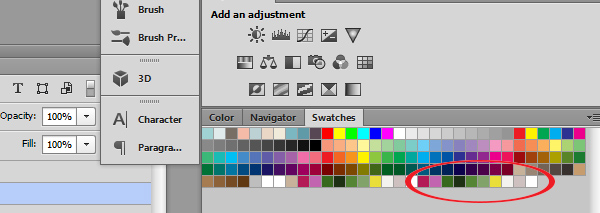
I really liked this palette, but wanted to expand it a little, so I added a shade of aqua and orange to it as well. Feel free to add to the color palette you create, if you need to.
I also wanted my kit colors to be pastel, rather than bright. I was able to create that look through my design process. Here is a preview of the papers, created using this method of creating my custom color palette.

I hope you will experiment with this fun technique the next time you are looking for just the perfect colors to scrap your photos with.
The papers pictured here are from my still-in-process kit, Heartsong. I hope to release it next week!


WOW. Here I’ve been using my eyedropper to select colors, then save them to a palette. This is SO much easier! Thank you so very much!!! >^..^<
Thanks for the great tutorial
now I’m working for so long with Photoshop but I did not know.
It is so simple …. you never stop learning. Thank you once again.
Greetings Finja
unfortunately speak no English, and let everything translated by Google 😉
When you use the ACT file, you would still work in RGB?
Thank you for another great tut!
Su
Thank you for letting me know this was helpful for you, ladies. I appreciate hearing form you. Su, your color mode only changes when you change it yourself in Color Mode. The ACT file itself just shows you the color table, according to what mode you are in. Does that help?
Yes’m! Thank you!
Great Tutorials
really appreciate this info, getting more into color palettes these days!
[…] week we explored Creating a Custom Color Palette. I hope you have had fun this week exploring that technique. Today we are going to explore how […]
[…] week we explored Creating a Custom Color Palette. I hope you have had fun this week exploring that technique. Today we are going to explore how […]
[…] weeks ago, we looked at Creating a Custom Color Palette, and then last week, we looked at how to use that Color Palette to easily recolor an object in […]
[…] Creating a Custom Color Palette in Photoshop and Photoshop Elements […]
[…] Creating a Custom Color Palette in Photoshop and Photoshop Elements […]
[…] Creating a Custom Color Palette in Photoshop and Photoshop Elements […]
[…] Creating a Custom Color Palette in Photoshop and Photoshop Elements […]
Thank you so much Karen. Such helpful info!