Last week we explored Creating a Custom Color Palette. I hope you have had fun this week exploring that technique. Today we are going to explore how to easily recolor an object.
As with most things in Photoshop, there are multiple ways to accomplish one goal. Today I am going to explore just one of the many ways to recolor objects. If you would like to learn additional ways, please leave me a comment expressing your interest, and I will be happy to share a few other techniques next week.
For the purposes of this tutorial, I am using Photoshop CS6. This method works in Photoshop Elements as well.
Let’s look at how to change the color of an object by using a Hue/Saturation Adjustment. I will use this purple heart from Heartsong in this tutorial.

I would like to change the heart to the rose color that is included in my Heartsong palette. Here’s how:
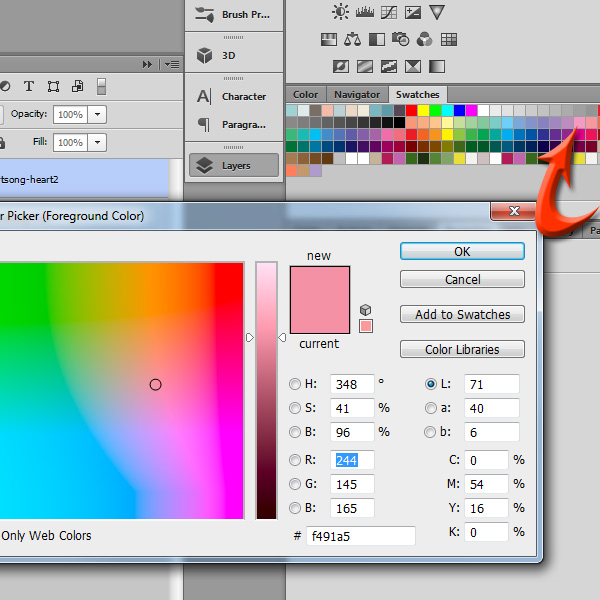
1. Click on the Color Picker in the Tool Box (left of your workspace).
2. Once the Color Picker opens, click on the color you would like to use. I have clicked on the rose color in my Swatches Panel. (You can also click on any color in your layout, or other document. You are not limited to choosing a color in the Swatches Panel.) Click OK.
3. Now you have a choice. You may add a Hue/Saturation layer adjustment in 2 ways. (Make sure that the layer of the object you intend to recolor is selected no matter which method you use.)
- Way 1: Click on the Hue/Saturation Adjustment icon in the Adjustments Panel.
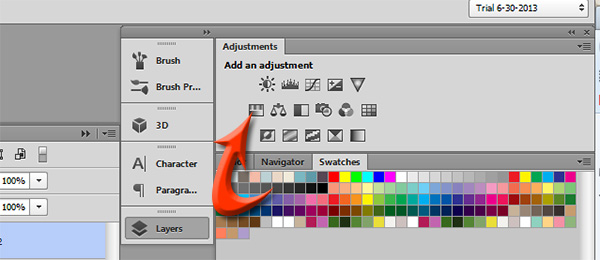
- Way 2: Go to the top Menu Bar and click on Layer > New Adjustment Layer > Hue/Saturation

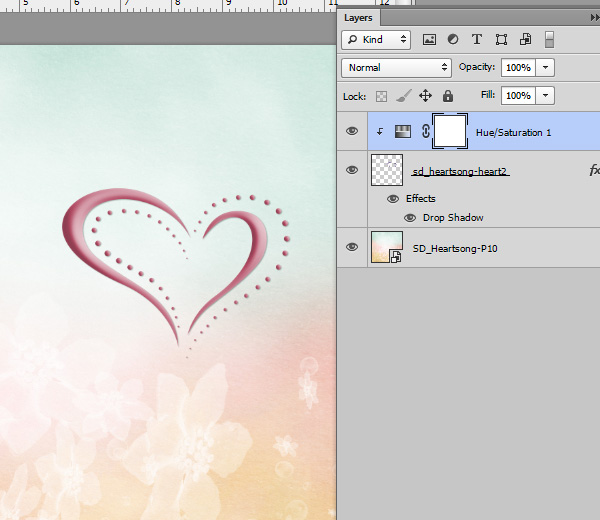
Both methods will add a Hue/Saturation Adjustment layer on the layer above the object you wish to recolor.
With Way 1, you will need to manually clip your layer adjustment to the object you wish to recolor. If you don’t, the layer adjustment will affect ALL of the layers below it and not JUST the object you wish to recolor. (Read more about clipping masks: Clipping Masks in Photoshop.)
With Way 2 you have the option of clipping that layer adjustment to your object as you create the layer itself. Just tick the box: Use Previous Layer to Create Clipping Mask. Now your layer mask will be applied and will already be clipped to the object you wish to recolor.

Since I have already selected the color I want to use as my recolor (rose color), I will tick the Colorize box. This will apply the rose color to my element. Sometimes this method gives me the perfect color immediately. Sometimes I need to play with the Saturation and/or Lightness sliders just a little bit to get the look I want.
In this case, I took the saturation up a little by moving the slider to the right. I’m happy with that, so I will just save it, being sure to give it a new name, so I don’t save over the original object. (It’s always a good idea to work with a duplicate of any object, just to keep yourself from saving over the original document.)
Recoloring objects is a GREAT way to stretch your kit stash! Some designers include every single element in every color in a kit palette. Some designers don’t. There are pros and cons to both philosophies, and it comes down to a personal designer preference. If you have a kit that has… say a purple heart in it, but you want that heart rose colored, now you know how to make that change yourself… and stretch your stash!
The paper and element used in this tutorial are included in my just-released Kit/Collection, Heartsong! Be sure to visit my SnickerdoodleDesigns blog to pick up a cluster freebie to help you get started scrapping what makes YOUR heart sing!


I would like to see the other ways to recolor. I think I have changed about half a dozen things I used to do one way, saw a tut, and changed my way. LOL I have used this method – the Hue Saturation Adjustment Layer, but sometimes, there are colors that just don’t take a new color well, like yellow. I usually desaturate those first. LOL
Thank you,
Su
Thanks, Su. Yes, desaturing an object, when you can’t get what you want from a Hue/Saturation Adjustment layer is another tactic to take!
[…] How to easily recolor an object in Photoshop and Photoshop Elements – 1 freebie(s)? […]
I’d love to know what other ways there are, thank you.
I had wondered if there was a way to use the color picker – and now I know the technique! Thank you so much for sharing your expertise with us! I would love to know the other ways to accomplish the same thing.
Another great tutorial Karen. I love this method as it keeps the shading/different hues on the elements. Thanks for sharing.
[…] Creating a Custom Color Palette, and then last week, we looked at how to use that Color Palette to easily recolor an object in Photoshop and Photoshop Elements. Today let’s look at one way of Selective […]
[…] Creating a Custom Color Palette, and then last week, we looked at how to use that Color Palette to easily recolor an object in Photoshop and Photoshop Elements. Today let’s look at one way of Selective Recoloring. … Read the rest of this tutorial […]
Thank you for this great tutorial. I once again learned something new, clipping the layer adjustment to the object.
[…] How to Easily Recolor an Object in Photoshop and Photoshop Elements […]