Adjustment Layers in Photoshop offer us the opportunity to make many creative decisions in our work. They can be intimidating at first; so today let’s take a look at some basic information about Adjustment Layers.
For the purposes of today’s tutorial I am using Photoshop CC2014. Please check your own Photoshop version to see how these tips work for you (but I’m pretty sure they are the same in most versions).
There are multiple ways to create a new Adjustment Layer:
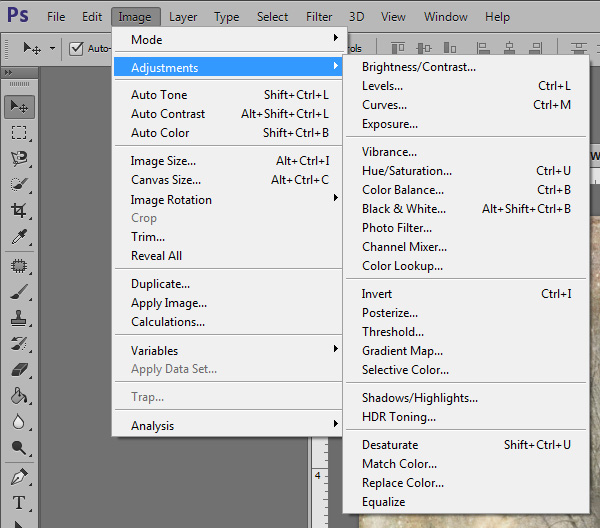
1. In the Layers Panel, click on the layer to which you would like to add an Adjustment Layer. This will make it the active layer. Go to the top Menu Bar and click on Image > Adjustments> then, in the pop-out window, select the adjustment layer you would like to apply.
2. Select the Adjustment you would like to apply from the Adjustment Panel. If you do not see an Adjustment Panel go to the top Menu Bar and click on Window and check “Adjustments.” The panel will open in a tab on the right. Hover your mouse over the icons and the name of the Adjustment will appear.
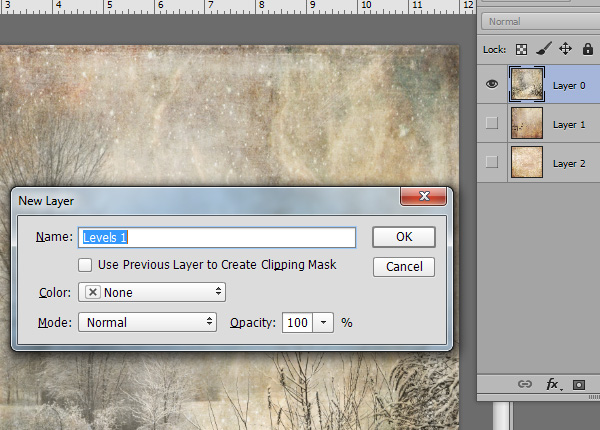
3. Press and hold the Alt key (Windows) or Option key (Mac). In the Adjustments Panel click on the Adjustment you would like to add. A window will open, offering several choices. In the image below you will see that I have chosen to add a Levels adjustment. Photoshop assigns the name of the Adjustment to the New Layer. This is my favorite way of adding an Adjustment Level because in the window that opens, we can make several choices which can save us time later.
- We can rename our Adjustment Layer if we like.
- We can also choose a color to apply to the layer in the Layers Panel. This makes it really easy to locate specific layers later.
- We can set the Blend Mode.
- We can choose the Opacity of the Adjustment Layer
- We can also “Use Previous layer to Create Clipping Mask.”
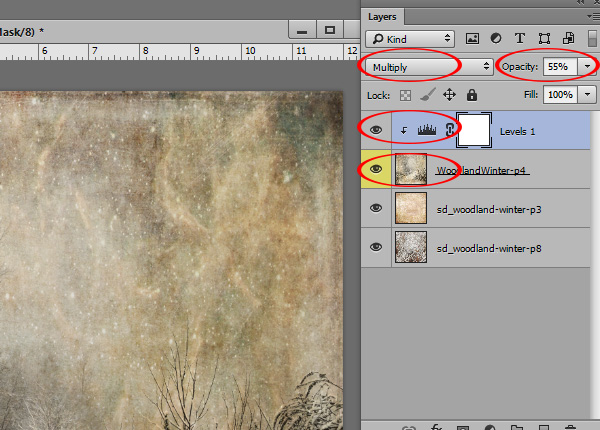
In the image below you can see that I set my Blend Mode to Multiply and my Opacity level at 55%. I chose to color code my layer yellow, and by clicking the “Use Previous layer to Create Clipping Mask” I have constrained the Adjustment Layer so that it will affect only the layer it is clipped to (as opposed to all of the layers beneath the Adjustment layer.) We know that the Adjustment Layer (Levels 1) is clipped to the WoodlandWinter-p4 because the Levels layer is indented and also has a down-pointing arrow in front of the Adjustment icon.
If you are using Method #1 or #2 to create a new Adjustment Layer, but would like to constrain the effect of the Adjustment to just one layer, hold down the Alt Key (Win) or Option Key (Mac), and then click on the line separating the adjustment layer from the layer to which you would like it applied.
Once you apply an Adjustment Layer, you can turn on and off the visibility of that layer by clicking on the “eye” icon. This is nice when you would like to compare your “before” and “after” images to see if you would like to keep the Adjustment.
Photoshop Elements users: Your path to these options is slightly different:
1. In the top Menu Bar: Layer > New Adjustment Layer, then choose the Adjustment you would like to apply.
2. You can add a new Adjustment layer by clicking on the circle (half blue/ half white) at the top of your Layers Panel. A drop-down menu will open with your Adjustment options. Once you make your selection, a Window will open with adjustment options.
Note: In the lower left corner of some Adjustments, there is a small square with a blue down-pointing arrow to the left. Check that box to constrain your Adjustment to the active layer. If that box is not checked, the Adjustment will affect not only the active document but also all of the layers below. If the chosen Adjustment does not offer the Clipping option, you can manually apply it by holding down the Alt key and clicking on the line inbetween the two layers you would like clipped together.
I hope this has been helpful for those of you who are beginning to familiarize yourself with Adjustment Layers.
If you would like to keep this tutorial on your computer for easy reference, you may download a PDF here.
If you are a visual learner, you can view this tutorial on SnickerdoodleDesigns YouTube Channel and on theStudio’s YouTube Channel.
Please head over to YouTube and take a minute to Follow both channels. Each Channel will have some exclusive videos, so by following both channels, you will be sure not to miss a thing! Thank you!!


Thanks for this, especially for the PSE part.
You’re welcome! 🙂 Thank you for your comment!
Thanks for the instructions for one layer and all layers and for both PS and PSE.
Very helpful!
Another winner Karen. Your tutorials are great, thank you so much for taking the time to write them.
Thank you so much for your tutorial. I love that you remember to include us PSE users in the instructions. Thank you again.
Thank you, Karen, for always answering my questions. Your tutorials give me something to refer back to and are part of my go-to reference materials.