This post was originally published by Toiny on September 20, 2010.
Introducing my, free, CU-okay, knockout style! Simply create a placeholder, one that you would normally clip a photo to, apply my knockout style and voila! All layers beneath the placeholder magically disappear… only to easily reappear by turning off the placeholder layer.
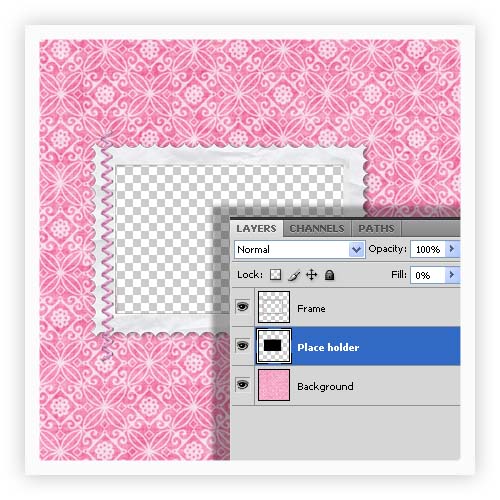
Before:

As you can see, I’ve got my background layer (note that it is unlocked). My placeholder, and then my frame. This way, I don’t see anything I might tuck under my frame… however, it is still there when I turn off the placeholder.
After:

I have applied my free knockout style to the placeholder layer. Now everything layered below this will be invisible. That is everything that is “covered” by the placeholder will be invisible. Simply turn off invisibility by clicking on the “eye” symbol next to the placeholder symbol to turn on all the invisible parts. It is really that simple.
The easiest way for you to try this is to download, unzip and drag my CU-okay Knockout style into your style palette.
CLICK HERE TO DOWNLOAD THE KNOCKOUT STYLE
Or, follow these simple directions:
In photoshop you can “knockout” all the layers underneath that layer. Soooo absolutely ideal for making quickpages. Here’s how:
- go to add layer style
- choose blending options
- Set fill opacity to 0%
- Set knockout to deep
Note: background layer must be unlocked
Lots of smooches,
Toiny


WOW! this is fabulous, THANK YOU.
it won’t let me download, I have signed in, I think in the shop, where should I sign in? – Sorry
You need to sign in the Forum. Unfortunately it’s two different sign-ins.
Silly me LOL. Thanks
[…] I wrote a previous tutorial on how to use the Knockout Style for Quickpages […]