Last week we talked about Using Styles to Stretch your Digi-Stash. Thank you for communicating with us via the Comment Section, which follows each post. We love hearing your ideas and receiving your input. Since there were some comments on extracting a designer’s pattern from a set of Styles, let’s explore that a little further today.
The pattern of a Style, is in part, what creates the personality of the Style. There are a lot of other choices a designer will make when creating a Style (such as Bevel and Emboss, and so forth), but the pattern itself, in general, is what first catches our attention. Here are some examples of what I mean:

Here we see Stratified Rock, Marble, Chipboard, Leather, Rusted Metal and Snow & Ice patterns.
They all are very different, and we would select one of them for use, based on the pattern that we see.
The pattern size itself can vary within a Style. Some designers create their Style patterns at 600×600, some at 900×900, for example, or various other sizes. There is no “right” or “wrong” size for a Style pattern. It is simply a creative choice.
We can turn off all of the designer choices for the style, leaving only the pattern visible and available for our use. This can be helpful in some situations. (For one specific example, please refer back to Using Styles to Stretch your Digi-Stash.)
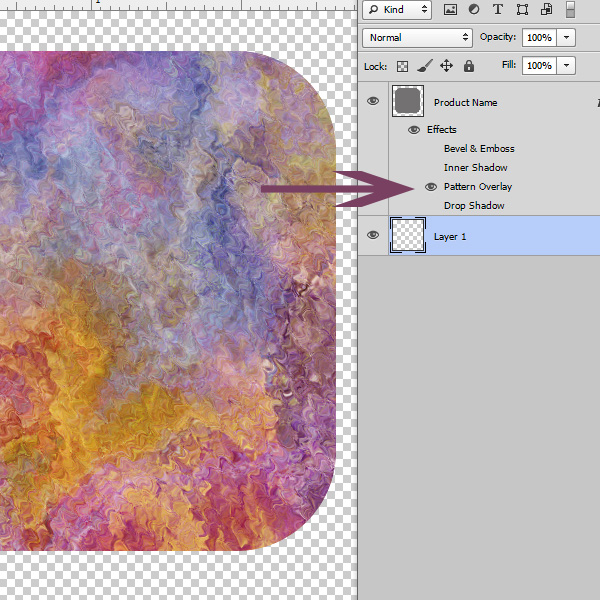
One suggestion offered by a reader last week was to create a new document, fill it with the pattern, and save that document as a jpg, to create a Style Sheet. Or alternatively to define the new document as a Photoshop pattern and save it for later use. Here are a few points to remember, when choosing to do that.
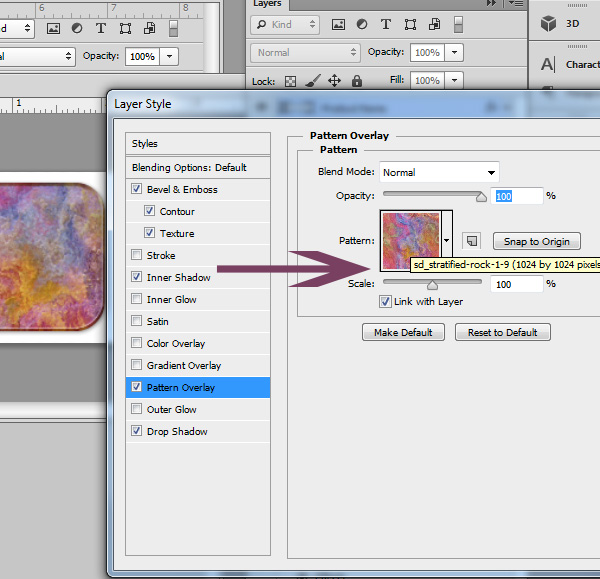
In order to see the full pattern, and no more than the full pattern, we need to know the size that the pattern was created. If we hover our mouse over the pattern file inside the Styles Panel, we will be able to see the size of the pattern.
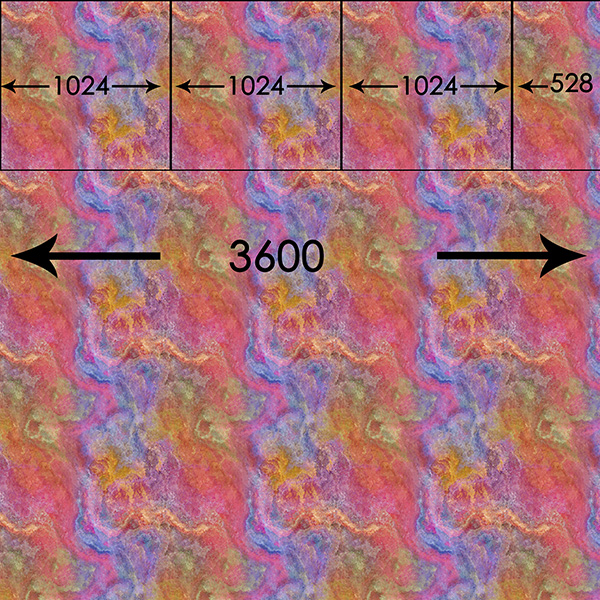
In the image below, you can see that my Stratified Rock pattern is 1024 x 1024.
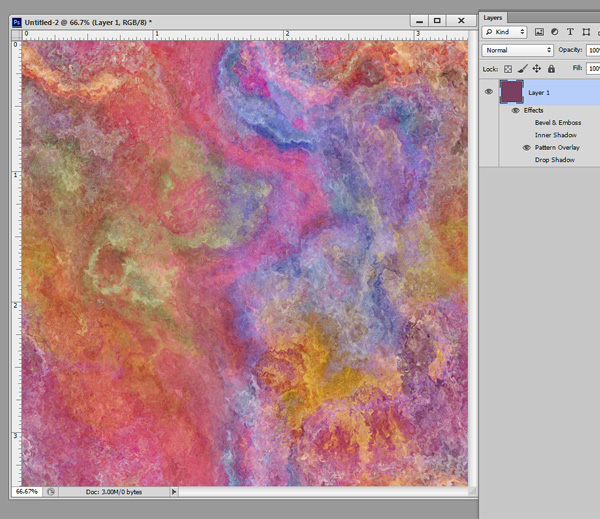
That means, in order for me to see the full pattern, and no more than the full pattern, I would need to create a 1024 x 1024 document and apply the style to it.
Here is what that would look like at 1024 x 1024, with all of the options invisible, with the exception of the pattern:
Now let’s Fill a 3600 x 3600 paper with the pattern (Edit > Fill > Pattern):
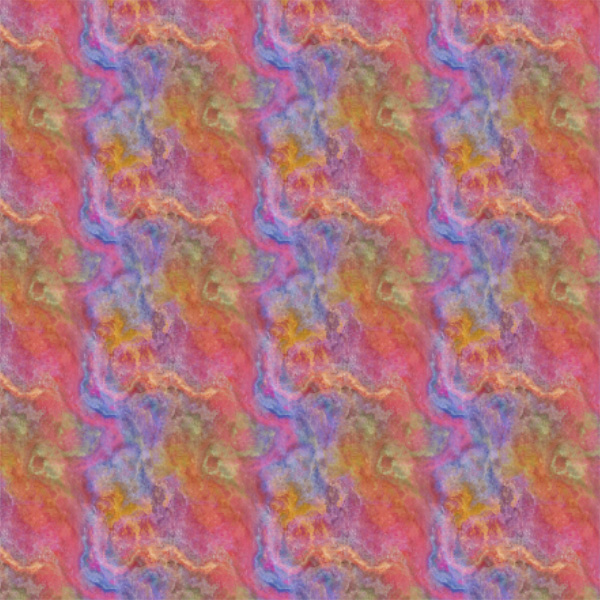
Not very pretty is it? Why does it look so different at this size? Because the pattern size is 1024 x 1024, so it must repeat itself to fill up the 3600 x 3600 document. In the image below, I have isolated the 1024 x 1024 pattern by applying a black stroke around the pattern, for a visual reference.
I think there is value in using the above document when clipping to a line-art, as demonstrated in last week’s blog post, but the same thing can be accomplished when applying the style to your line art or embellishment and turning off the options you don’t want to include, as demonstrated in Using Styles to Stretch your Digi-Stash.
Some digital scrappers, however, prefer to use Style Sheets, rather than Styles. For this reason, many designers will include Style Sheets in their Styles packages. If you prefer to use jpgs instead of Styles in your work, and a designer hasn’t included Style Sheets, you can create your own Style Sheets as described above. However, if you do, please be sure to read the Designer’s Terms of Use. Extraction of the pattern might be a violation of their terms. Here is, in part, one of the TOU’s that came with a Style that I, myself, purchased for my own use:
“The Buyer shall not copy, modify, reverse compile, or reverse engineer the Product…. ”
It would be very easy to create a Style Sheet for your own personal use, but, in time, forget it actually was an extracted pattern from a Designer’s Style. This would be a concern when using the pattern in a layout or project, which required proper designer credit (for example online or in a printed publication).
The safest course of action, always, is to ask a designer if you have any doubts at all about their Terms of Use.
If you prefer to simply use the Style as it came, but modify it to your needs, you can easily do that by scaling the pattern in the Styles panel. We’ll talk about that next week!
P.S. For the purposes of this tutorial, I used my own Styles as an example, simply because it was easier for me to do so. Please visit our Commercial Use store to view the 446 Photoshop Styles we have for your designing pleasure, all created by our talented Studio designers!
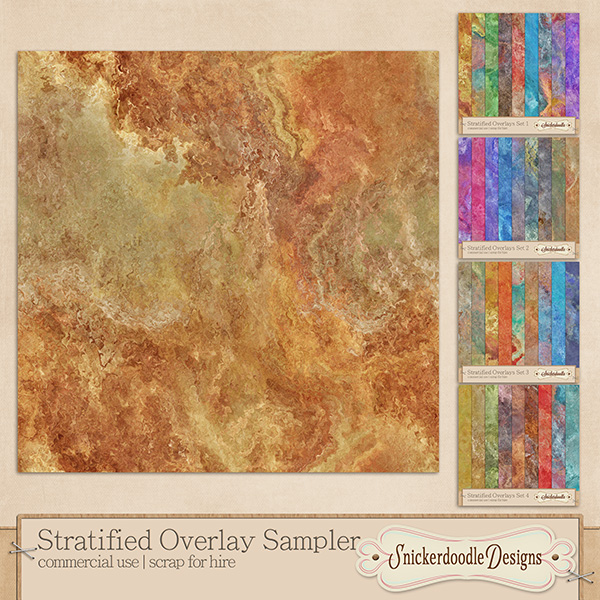
I have some new Stratified Overlays in my CU shop. These Overlays are sister companions to the Stratified Rock Styles. You may download a Sample Overlay here.


WOW!!! Am I ever so happy my computer is finally up and running so I could read this great tutorial. Thanks so much for the sampler. I am anxious to try it once I download my PSE to my computer. I have to download all my software programs now that I finally have a working computer again.
As always, thank you very much. Absolutely beautiful. Enjoyed seeing in you newsletter how these overlays can be used. Can’t wait to try it out.
>Your Stratified Rock Styles are gorgeous – Thank you very much !
so love all your tutorials Karen, well written and easily understood.
You just keep wowing us with new things – stratified is gorgeous. It almost looks like oil paint or some kind of paint. The design is fabulous.
Since I am a regular commenter here, and was commenting on last weeks post, I want to reiterate what Karen is saying. If, like I said I sometimes do, I make a ‘style’ sheet’, it is the same thing as me using that designer’s style. In my book, anyway. No matter what I pull out of a designer’s preset, all components are still hers. This means I have to give her credit, follow her terms and abide by her rules with those styles. I’m glad Karen took the time for that. I often don’t only because I know better and it doesn’t occur to me. However, if I am going to add things to other folks’ posts, I really need to add the necessary precautions. Sorry, Karen. I will do that from here on. Thanks for being so kind about it.
If anyone is wondering what the hubbub is I am writing about, everyone who offers any kind of download online, speaking for the scrapping community, but, it is far more reaching than that. Say for scrapbooking sake, though, a designer may often give away a freebie. You must follow that designers’ terms. It’s the law. But, and I speak from experience, you don’t want someone you have admired and respected to come to you, in the presence of all the other scrappers, or not, to tell you that you may have used something you shouldn’t have. I found some elements that were only identifiable by a number. I looked a little bit to see if I could find the artist. Couldn’t find her, so, stupid me, uses the elements anyway. I got a very sweet letter from the artist to this effect. I felt like a fool. And, I was. They were not mine and I should never had used them. The lady I had dealings with was quite nice about it, but, I don’t expect all of them would be. I was fortunate, I think. I also make sure the file name shows the designer when downloading, too! Commercial Use products mostly require credit, too, so, don’t forget those! Some CU product creators do not allow the product to be used to make a freebie. Just read the TOU’s.
Thank you,
Su
[…] Exploring Patterns in Photoshop Styles – 2 freebie(s) […]
Great tut, Karen. Thanks for the pattern.
Thanks for yet another helpful tutorial. I am learning a lot about one of my favorite subjects. Thanks for sharing your knowledge so generously.
I’ve moved many times in my long life so I especially appreciate your lessons during a move!
I’m looking forward to the next tutorial!
[…] you can pick up a sweet Sampler freebie SnickerdoodleDesigns has for you. Come over to theStudio Blog for the freebie, and an easy tutorial on how to use these […]
Love this sampler…thank you!! xx
[…] can pick up a Sampler freebie SnickerdoodleDesigns has for you. Come over to theStudio Blog for the freebie, and an easy tutorial on how to use these […]
[…] Exploring Patterns in Photoshop Styles […]