Over the past few weeks, we have been talking about creating selections using the Rectangular Marquee and Elliptical Tools. In general, Photoshop offers us multiple ways to accomplish the same goals, and so it comes as no surprise that other tools are available for us to utilize when we are making selections. Other selection Tools and methods include: the Lasso, the Polygonal Lasso, the Magnetic Lasso, the Quick Selection, the Magic Wand, and Color Range Tools. Today, let’s look at the first 3 methods, and next week, the final 3.
I will be working with a flower-border element from my Heartsong Kit, and demonstrating with Photoshop CS6. These 3 Tools are also available in Photoshop Elements.

The Lasso, Polygonal Lasso and Magnetic Lasso Tools are all nested together in the 3rd grouping from the top, on the Toolbar.

LASSO TOOL:
The Lasso Tool allows you to draw free-form shapes. To use this tool:
- Select the Lasso Tool.
- Use the selection options in the top Options bar to Create New, Add to, Subtract From, and/or Intersect selections. (We covered these options in The Marquee Tools in Photoshop, Part 1.).
- Enter a Feather amount in Options bar, if desired (Also covered in The Marquee Tools in Photoshop, Part 1.).
- Check Anti-alias to help avoid jaggies.
- Left-click your mouse button, and keeping the button depressed, draw the selection that you want.
- Connect the end with the beginning of your selection, and release the mouse button to close the selection shape.
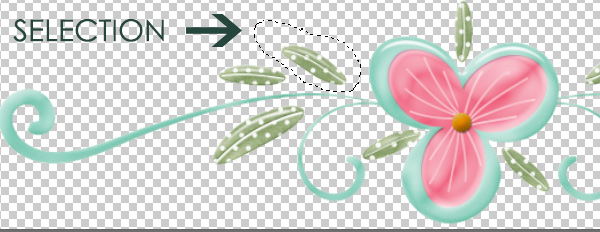
This free-form selection method can be especially helpful when you need to make a selection in tight spaces. Zoom into your image if the item you need to select is even closer than what is pictured above. This method is also really useful when selecting a single letter on an alpha sheet.

POLYGONAL LASSO:
The Polygonal Lasso creates a straight line selection. To use this tool:
- Select the Polygonal Lasso Tool.
- Make any desired choices in the top Options Bar (Create new, add to, subtract from, intersect, and Feather).
- Check Anti-alias.
- Click on your document where you would like to start your selection. Release your mouse. Click on the document where you would like to create your second point. Photoshop will add an anchor point for you. Continue in this fashion until you have finished your selection.
- Double-clicking anywhere or clicking at your starting point will tell Photoshop to close the selection.
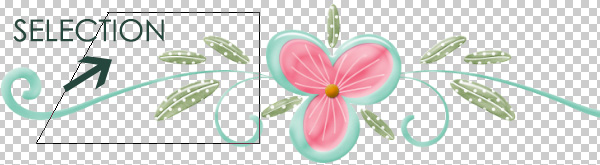
Tip: The Polygonal Lasso Tool will create straight lines in any direction. However, if you click and hold Shift while drawing your lines, or depress Shift after you have drawn your line but before you click to create an anchor point, Photoshop will constrain the angle of your line, making it perfectly straight for you. In the image above, I created the top, right side, and bottom by constraining my line using the Shift key. I did not use the Shift key when I drew the left line, so was able to choose the angle that I wanted.
MAGNETIC LASSO:
The Magnetic Lasso tool creates a selection by following along the edge of an object. To use this tool:
- Select the Magnetic Lasso Tool.
- Make any desired choices in the top Options Bar (Create new, add to, subtract from, intersect, and Feather).
- Check Anti-alias.
- With the Magnetic Lasso, we also have some other options available. In the top Options bar:
- Width: The number chosen here will tell Photoshop how many pixels to consider when looking at the edge of the object. The default of 10 px usually works well.
- Contrast: The Magnetic Lasso Tool makes selections based on the change in brightness values. Enter the percentage here to tell Photoshop how much of a shift in the brightness values to use in determining the edges. The higher the percentage, the less “tolerant” Photoshop is of brightness values. The default of 10% usually works well; but if you find it isn’t making a clean enough selection, try increasing the percentage value.
- Frequency: The higher the number, the more anchor points Photoshop will add to your selection.
- Left click near the edge of your element to create the first anchor point, then release your mouse button.
- Draw (don’t drag with the mouse button depressed) closely around the edge of the element and Photoshop will drop anchor points as you draw.
- Double-click anywhere, or click on the starting point to close your selection.
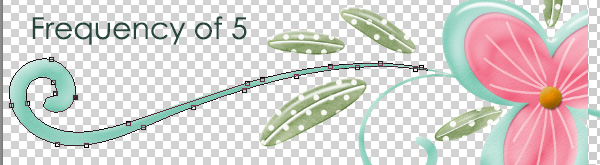

Tip: If you don’t like an anchor point that Photoshop has added, hit Delete, and the last anchor point will be deleted.
Making selections is such an integral part of what we do in scrapbooking. It’s great to have multiple ways to accomplish this task! Next week we will look at 3 additional methods… one of them being my all-time favorite!


I think a lot of us play the tools before we learn to tweek them with the top options bar and they don’t seem to be really worth while. But, when ya actually know what you are dong, it makes all the difference in the world!
Thank you, ma’m!
Su
I agree with the above comment. Your tutorial is very helpful. Many thanks!
Sharron
[…] SnickerdoodleDesigns has a new Tutorial on how to make selections in Photoshop. An easy to follow guide on how to use the selection tool! Making Selections in Photoshop, Part 1 […]
[…] Making Selections in Photoshop, Part 1 – 1 freebie(s)? […]
Thanks for the tips Karen. Unlike Su, I always begin with the options bar, and not the tool itself when I’m trying out a new tool. I’ve found that this makes fine tuning later a lot easier—but too, Karen, it’s real easy to forget to set frequency and things like that. Looking forward to next week’s tips. Sometimes when Photoshop leaves the tool with some weird setting I’ve picked out, I forget to adjust it! 🙂
Starting with CS6, you can change the ‘Default’ setting on all the presets. Or, if you can deal with the current Default, just click ‘Default’ on the windows when you open them. Actually, there is a setting for that in Preferences isn’t there? I’m not sure. I’m always looking for easy ways to do things! LOL
I didn’t even notice some of the top menus for a long time. (Can ya tell I am completely self-taught?) The ‘Auto-Select’ feature nearly did me in! I didn’t know what it was, so, I clicked it anyway. I spent an entire afternoon trying to figure out why I could not click on the layer I wanted in the work space. I’d have to turn off all the layers above the one I wanted. It was stupid of me! I was crying, even! Then, I saw that box. It is only there when the Move Tool is activated.
I’ve always done things the hard way. You have taught me something, Pssequimages! Thank you! I enjoyed this, too!
Su
Thanks for the feedback, ladies.
[…] Lasso, and the Polygonal Lasso Tools. If you missed that tutorial, you will find it here: Making Selections in Photoshop, Part 1. This week we will look at 3 additional ways to make selections using Quick Selection, the Magic […]