We have had multiple requests to explain how to use Alpha Sheets, so let’s take a look at that today. Just what are Alpha Sheets?
Some Alphabet Sets will come with an “Alpha Sheet,” where the entire alphabet will be on one png file. Other packs come with each letter as a separate png file, while still other sets will come with both options.
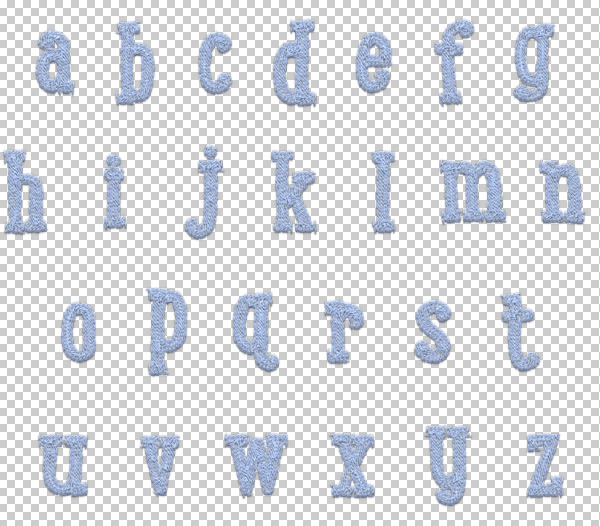
This is what an Alpha Sheet would look like; the letters are all on one file (PNG), with a transparent background. (You might also see it provided in an Alpha set as a PSD file, with the letters on one layer, and a white background, just for easier viewing.)
If you have an Alpha Sheet, the Rectangular and Elliptical Tools are great selections tools to help you move individual letters onto your document. These tools are found in the Tool Bar, the 2nd Tool Preset from the top. Click on the triangle in the lower right corner to expand the tool options.

GENERAL OVERVIEW OF THESE TWO TOOLS:
Rectangular Marquee Tool:
- Select the Rectangular Marquee Tool in the toolbox.
- Choose which options you would like to activate in the Tools Option Box.
- You may choose to create a new selection, add to a selection, subtract from a selection, or intersect with a section.
- You may choose to feather your selections edge by entering a pixel amount in the “Feather” box.
- The Anti-alias option is not available with the Rectangular Marquee.
- In the Style box, you may choose a Normal (free form), Fixed Ratio, or Fixed Size selections.
- Drag out your selection on your document.
Elliptical Marquee Tool:
- Select the Elliptical Marquee Tool in the toolbox.
- Choose which options you would like to activate in the Tools Option Box.
- You may choose to create a new selection, add to a selection, subtract from a selection, or intersect with a section.
- You may choose to feather your selections edge by entering a pixel amount in the “Feather” box.
- The Anti-alias option is available with the Elliptical Marquee Tool. Check this box to create a softer selection.
- In the Style box, you may choose a Normal (free form), Fixed Ratio, or Fixed Size selections.
- Drag out your selection on your document.
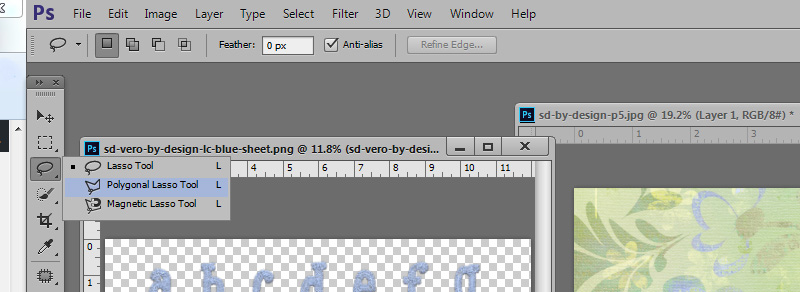
The Lasso and Polygonal Lasso Tools can also be helpful with an Alpha Sheet. They can be found nested in the 2nd selection tool icon. Click on the triangle to expand your options and see these tools.
Now let’s look at a practical way to use either the Rectangular or Elliptical Tools.
GENERAL OVERVIEW OF THESE TWO TOOLS:
Lasso Tool:
- Select the Lasso Tool in the toolbox.
- Choose which options you would like to activate in the Tools Option Box.
- You may choose to create a new selection, add to a selection, subtract from a selection, or intersect with a section.
- You may choose to feather your selections edge by entering a pixel amount in the “Feather” box.
- The Anti-alias option is available with the Lasso Marquee Tool. Check this box to create a softer selection.
- Click on your document. Without letting go of your mouse, draw out the selection you want. End your selection at the starting point of your selection. When you reach the starting point, Photoshop will close the selection for you, and you will see Marching Ants, indicating your selection.
Polygonal Lasso Tool:
- Select the Polygonal Lasso Tool in the toolbox.
- Choose which options you would like to activate in the Tools Option Box.
- You may choose to create a new selection, add to a selection, subtract from a selection, or intersect with a section.
- You may choose to feather your selections edge by entering a pixel amount in the “Feather” box.
- The Anti-alias option is available with the Polygonal Lasso Marquee Tool. Check this box to create a softer selection.
- Click on your document to create an anchor point. Let go of your mouse. Move to where you would like to make your next anchor point and click. Continue until you have reached your starting point. Photoshop will close the selectin for you, and you will see Marching Ants, indicating your selection.
Now let’s see how to use these tools in a practical manner, using an Alpha Sheet. For this purpose, we don’t won’t want to set a feather on our selections.
- Open the Alpha Sheet. I find it is helpful to reduce the size of the Alpha Sheet, and let it reside on my canvas right next to my working document.
- Use the tool of your choice and create a selection around your chosen letter.
- Once the letter has been selected, click on the Move Tool (top icon in the Tool bar); click on your selected letter; drag it onto your document.
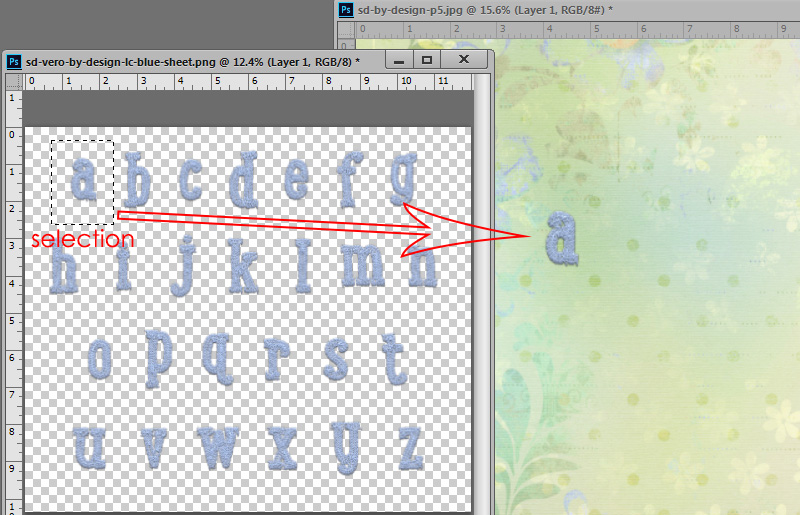
And that’s it! Just continue selecting the letters you want to complete your title, phrase or word art graphic.

Products used in this tutorial: Paper, Alphas and Alpha Cluster (on the “S”) from By Design, a collaboration between SnickerdoodleDesigns and Vero – the French Touch. Butterfly is from SnickerdoodleDesigns Butterflies 2 (resized and recolored for this word art graphic)
Thanks for stopping by! See you next week!


Thanks, Karen. Cute wordart and great information!
Another terrific tutorial Karen, and the alpha is just gorgeous. Thank you so much.
Thank you so much for sharing both your expertise and your lovely creation!
Thanks, Steph and Nightshadow! I’m glad you found this helpful.
Thanks so much for the great tutorial and especially a big thank you for the PDF file. The alpha sheet and Sweet word art is so nice too. Thanks.
That IS cool! I think I used an alpha sheet one time. LOL I really like the Alpha! That’s cute!
Thank you!
Su
You are welcome, Carol and Su!
Thank you so much. I used to delete all those alpha sheets, thinking they were totally useless. Then I started saving some in a folder, thinking maybe someone, someday would find a use for them. NOW, you have made them useful to me! Well, I’m pretty sure I can follow the instructions. Tehe. Will see.
Thank you so much 🙂
Oh wow thank you for all these great tips and explanations.
You’re so welcome, Christine! I’m glad it was helpful for you.