Adding a lot of journaling to a page can be difficult at times. If you have a long story to share, sometimes it can look “boxey” and not integrate well with the images on your page. But we scrap to share our lives, our stories…. so today let’s take a look at one way to make long journaling pieces a tad more interesting looking.
Let’s go from uninteresting…..

…….to this much more attractive and integrated custom text box.

For this tutorial I am using CC2015. The technique will work with any Photoshop version that has a Pen tool, although in previous versions there may be a slight variation in technique. While Photoshop Elements does not have a Pen Tool, I do have a work-around for you, so keep reading!
To create a Custom Text Box:
1. Have the element you would like to create a custom text box for on your canvas.
2. Click on the element layer to make it the active layer.
3. Select the Pen Tool. (Shortcut “P”).
4. Select “Path” in the top Menu Options Bar.

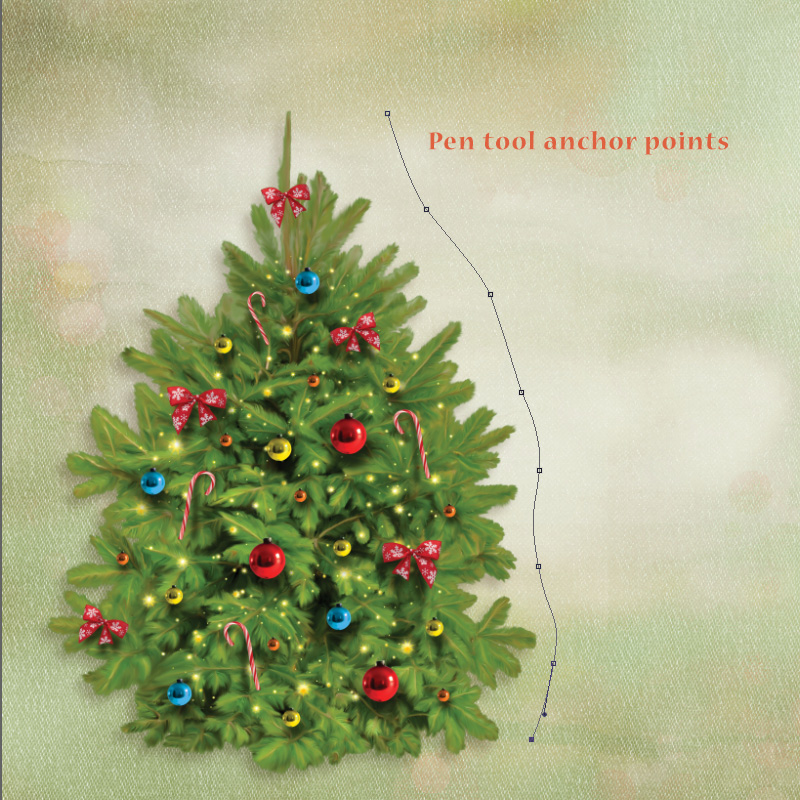
5. Click on your document near the top of your element, here, the Christmas tree, to set your first Anchor Point (Anchor points will reflect as small squares on your document.) Release your mouse.
6. Click a second time on your document a little away from your first anchor point. Before releasing your mouse, drag slightly down and to the right or left in order to create a slight curve around your element. Things can get wonky fast, so take it slow and use short movements.
7. Continue until you have a path along the entire side of your element where you want your text box contour. This doesn’t have to be perfect. Just a general shape will be fine!
8. Hold down Shift, and click on the right edge of your document to establish the right edge of your text box. (Holding down Shift as you click will constrain the movement of the path, making it straight.)
9.Using the same method, click near the top right, then click on your first anchor point to close the path. When you path is closed, you will notice that all of the anchor points, are all now solidly colored black.
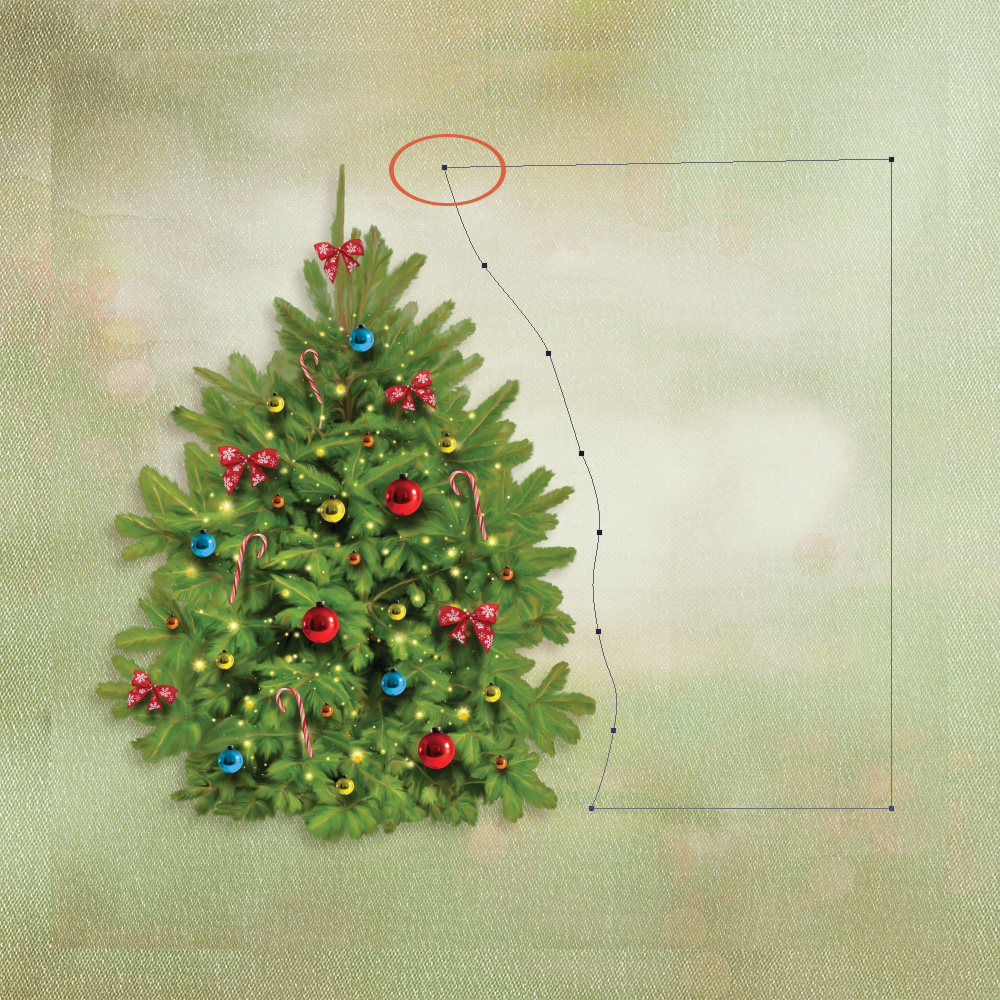
10. Press and hold the Control key, while clicking on the very first anchor point you placed on your document. This will allow you to manipulate the anchor points.
11. While still holding down Control, click on the top right anchor point and move it either up or down, as needed, to create a straight line. You can just “eyeball” it, or pull down a guideline to help you keep the adjustment straight.
12. Once you have straightened your top line, release the Control key and mouse.
13. Go to your Paragraph Panel. (If you do not keep this Panel docked, go to the top Menu Bar > Window > Paragraph, and it will open for you.) Click on Right Justify.

14. Click on the Text Tool, and move your mouse into the text area you have just created. The cursor will change to an “I” looking shape with a tiny line through it, and a circle surrounding it. Click anywhere within your text box and start typing, filling up the shape.
15. Add embellishments as you like, and you’re done!

If you are not comfortable with the Pen Tool, or are a Photoshop Elements user, I think you will find one of our older tutorials helpful. It was written by Steph (one of theStudio’s designers who has taken time off to be a full-time stay-at-home-Mom). This tutorial was written in 2012, and it’s a good reminder that our blog is full of helpful tutorials. Just type in the Search Box your point of interest, and you might be surprised to find what pops up for you! Steph’s tutorial link is: Tuesday Tutorial: Text Boxes.
Credits: The graphics in this tutorial are from Holiday Hoopla, and the (recolored) background paper from Deck the Halls, both by SnickerdoodleDesigns.
If you are looking for some interesting shapes or great graphics to practice your new skills on, pop on over to our Christmas in July Sale! Save at least 50% on all Christmas-related items, both Personal Use and Commercial Use!

I have a Deck the Halls cluster for you to practice with! This was created by Kabra, a member of my Creative Team, and I thought with all of the angles it has, it would be a perfect practice piece! You may download it by clicking on the image below.
If you would like to keep this tutorial on your computer for easy reference, you may download a PDF here.
If you are a visual learner, you can view this tutorial on SnickerdoodleDesigns You Tube Channel and on theStudio’s You Tube Channel.
Please head over to YouTube and take a minute to Follow both channels. Each Channel will have some exclusive videos, so by following both channels, you will be sure not to miss a thing!
See you next week!


This is so simple, yet, is seems like it would be daunting! LOL Thank you for keeping things so easy and fun!
Su
I am not the Steph mentioned above. The alternative mentioned for PSE does not work from what I can tell. In reading the comments on the tutorial from 2012, everyone said it didn’t work in PSE even version 13. They did mentioned being able to use the Shape tool to put text inside a shape. This has worked for the last couple versions of PSE but you must use the shape tool and first Text Tool option. You can fudge your shape somewhat by adding to a shape with another shape to create a unique shape (using the extra tools on the right side of the Shape tool area, like, ADD to Shape area, Subtract , Intersect and Exclude) . But I don’t think PSE users can actually “draw” a unique shape and put text inside of it.
I should have added that in the older tutorial, it mentions selecting the option “Make Work Path” from the SELECT tab. This option is not available in PSE.
Thank you so much for your tutorial and for the lovely cluster. And thanks so much for making it available in PDF format so I can refer to it later without having to hunt it down. Much appreciated!
Thanks, Steph, for pointing this out. I just spent about 30 minutes in PSE 13 right now and couldn’t find a solution; so I will check with a PSE Expert this week and see what I can find out.
Patchas, thank you for your comment and for letting me know you find the PDF helpful.
Thanks, Karen. I also tried various scenarios in PSE 13 and could not get anything to work that was easy. I was able to fudge a bit by creating an usual shape by adding on extra shapes to the original.
[…] Creating a Custom Text Box in Photoshop […]
Thank you for the beautiful cluster and the great tutorial! I really appreciate having the tutorial in pdf. 🙂
[…] Not sure how to create a custom text box? Here’s a previous tutorial on one way to do it: Creating a Custom Text Box. […]
[…] Creating a Custom Text Box in Photoshop […]