We are having a big Retirement Sale here at theStudio this weekend (more about that later). To most designers, if not all, our designs are very personal to us. They are created from our thoughts, dreams, and imagination. To retire our designs, no matter how old they are, is hard. They are a part of our history.
With this in mind, it wasn’t a far leap for me to start thinking about the History Panel in Photoshop.
Have you, either as a designer or layout artist, ever worked on a design or scrapbook page, really liked the final result, and then couldn’t remember how you achieved it? I know I have.
Photoshop gives us the History Panel to help us in situations such as these. There is a LOT we can do with the History Panel, but today I would like to focus on just one thing. One thing that is easy to do. One thing that can be really helpful to us all, I think, and that is saving the history state of a document. Here’s what you need to know:
1. If you do not have your History Panel open, you can find it by going to the top Menu Bar, then Window > History.
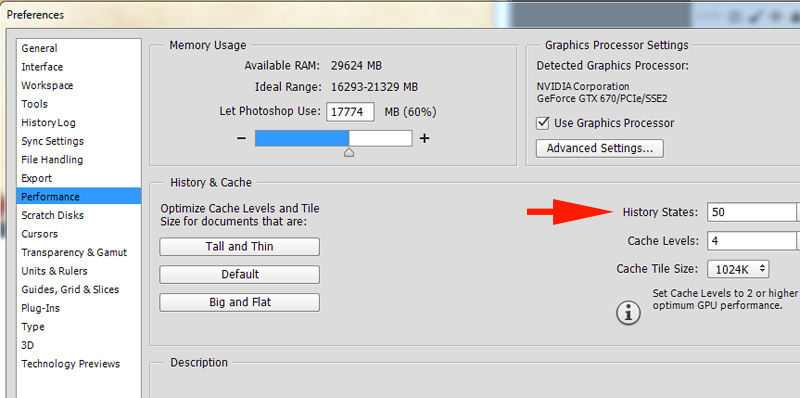
2. By default, Adobe saves 20 history states, in order to save memory. If you would like more states to be saved, you can reset that number by going to: Edit > Preferences > Performance. I have CC2015 set to save 50 History States.
Photoshop Elements users: You may set your history states, as described here; but PSE does not offer you the option of saving your steps, as described below.
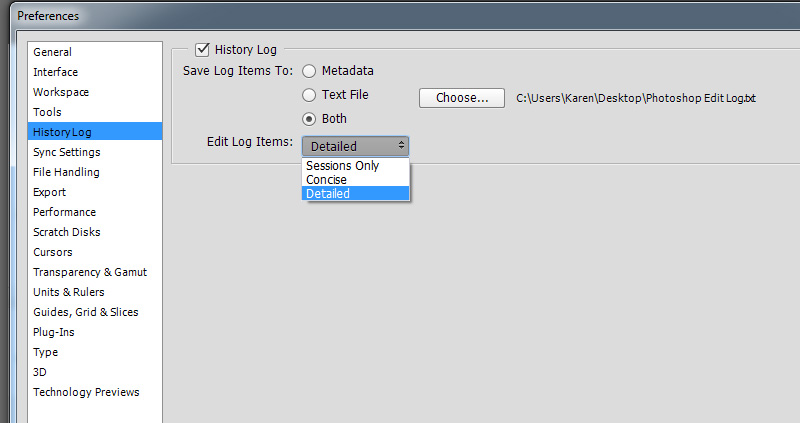
3. Before (preferable) or immediately after opening a document, you must set up Photoshop to record and save your working steps. This is how:
- Edit > Preferences > History Log (I am using CS2015. If you are using another version of Photoshop, your path might be slightly different. Just look for the History Log.)
- The History Log options box will open for you. You may choose Metadata, Text File, or Both.
- You will be able to read Metadata in Adobe Bridge or in Photoshop using the path: File > File Info > Photoshop.
- You will be able to read “Text File,” using Notepad or Text Edit (Mac), or Word (You will need to change the File Type to “Text Files” in the lower right corner of the Word “Open” window).
- You may choose both if you like.
- Choose where to save your Text File by Clicking on the “Choose” button.
- In the “Edit Log Items” drop-down box, you may choose:
- Sessions Only: Adobe only records basic session information, such as when the file was opened and closed.
- Concise: Information on actions taken on the document.
- Detailed: This includes the most data, such as opening; closing; dates and times of actions taken. (I choose this option. I want as much information as possible.)
4. Now you are ready to work on your document. Just begin working as you normally would and Adobe will record all of your steps. You can view your steps at any time by clicking on the History Tab in your open panels.
5. Once you are finished working, save your document as your normally would. If you have to close your file before you are finished working on it, that’s okay. When you reopen the file, Photoshop will automatically start recording your steps again on the same metadata or text file.
By reviewing the metadata file or text file, you will be able to tell exactly what you did during your working session(s).
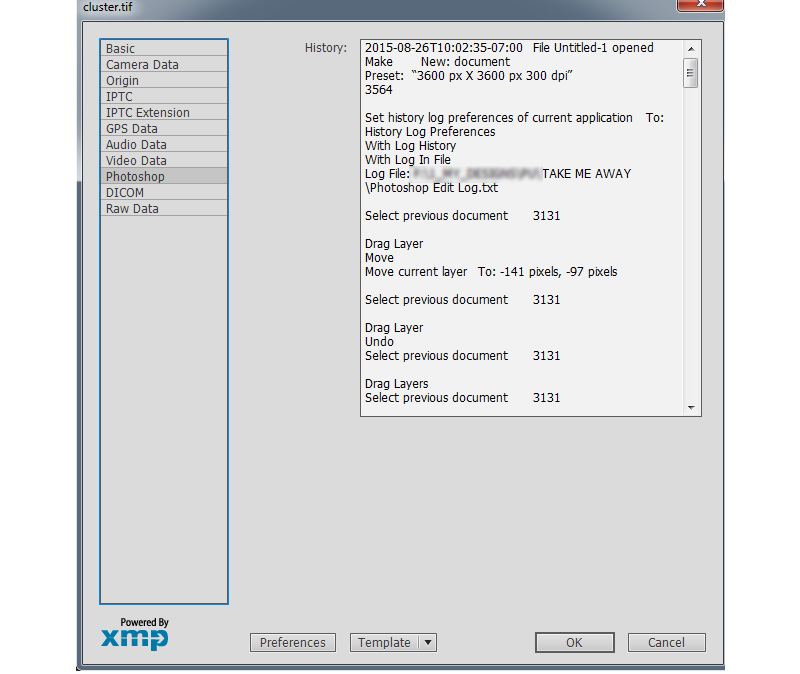
If you decide to view your information via Photoshop: File > File Info > Photoshop, you will see something like what is pictured below.
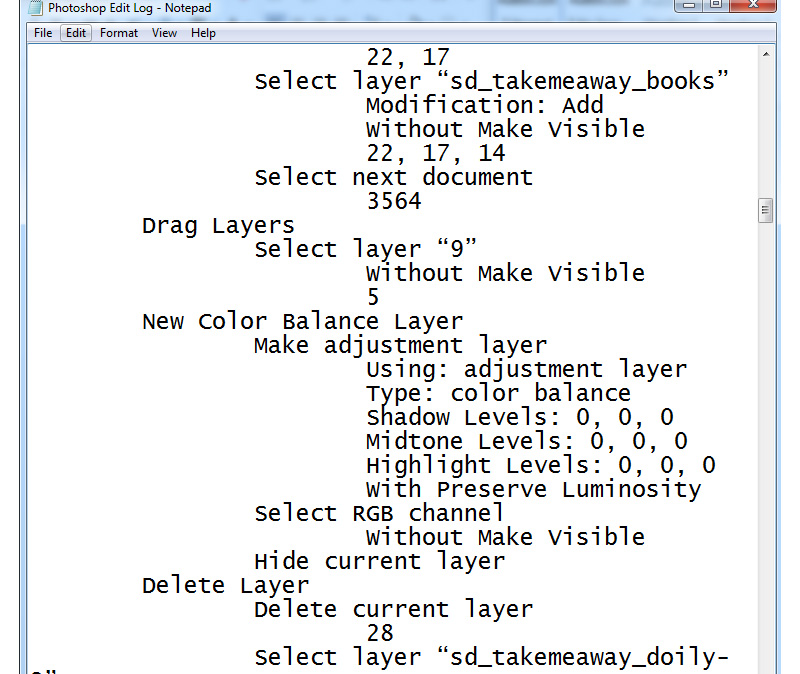
If you decide to view your information view Text File, you would see something like this:
It’s great to know that we can get lost in the creation process without having to worry about remembering what specific steps we took. By viewing our History State, we will know!
I promised information about our Retirement Sale, in both our Personal Use and Commercial Use stores. Snatch a part of history and save 75% on some great designs, now through September 3rd.
And here’s a Take Me Away Cluster, yours just for stopping by today!
Click on the image below to download.

If you would like to keep this tutorial on your computer for easy reference, you may download a PDF here.
If you are a visual learner, you can view this tutorial on SnickerdoodleDesigns You Tube Channel and on theStudio’s You Tube Channel.
Please head over to YouTube and take a minute to Follow both channels. Each Channel will have some exclusive videos, so by following both channels, you will be sure not to miss a thing!
See you next week!


Thank you Karen, this will be so useful, something else I didn’t know, I love your tutorials, you make them so simple to understand.
[…] Save your Document History – 3 freebie(s) […]
Great tut, Karen!
Thank you, Faith and Dona. I use this tip for my own design work, but I can see it being really useful for those creating scrapbook pages too, either for yourself or as a member of a Creative Team. You never know when someone is going to ask just how you did something!
Well, this is sure helpful! Question: Does PS load the saved history into the History palette when you re-open the doc you were working on? Like, if you had to close it and come back. Does it load that info or is it just there for your own information?
I appreciate it very much and thank you for yet another fab tutorial!
Su