When deciding upon the name for this blog post, I just could not resist playing off the song title, ” The Shadow of your Smile,” a beautiful piece that has been recorded by so many fabulous vocalists. But today I will not be talking about songs, but rather about shadows on Photoshop Styles.
Some Photoshop Styles come with shadows, and some do not. There are reasons to create styles both ways, and it’s truly a designer’s preference.
If you want to use a Photoshop Style that does not have a shadow, if you are using a Style that has a shadow that is not quite what you are looking for, or if you want to create your own custom shadow, you can easily make those changes!
Today I am using Photoshop CS6, but these tips should work in most, if not all, versions of Photoshop. This works well with Photoshop Elements too; although paths may be different depending upon what version you are using.
Let’s start with this example. I have applied a new style of mine, String Photoshop Styles, to the text and flourish below. When I created the style, I elected to add a slight shadow to it.

Photoshop users:
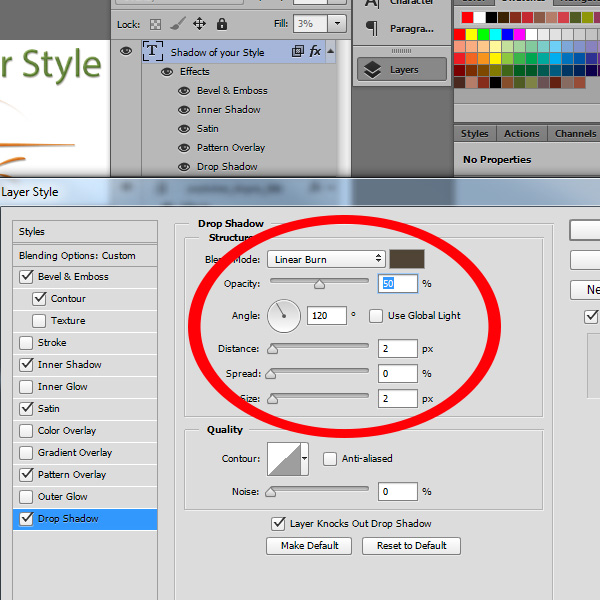
- If you do not see all of the layer style effects visible on your layer, click on the down-pointing arrow to the far right of the layer to expand the effects panel.
- If you do not want a shadow at all, click on the visibility eyeball near the Drop Shadow effect to turn it off.

- If you want to adjust the size, color, or other options of the shadow, double-click on the effects panel to open the Layer Style dialogue box, then make your adjustments in the Structure area.
- If you want to create a custom shadow: As in most things with Photoshop, there are multiple ways to accomplish the same task. This is my favorite way to add a custom shadow to an element that has a style applied to it.
- Expand the Effects panel, and click on the visibility eyeball near the Drop Shadow to turn it off.
- Create a new blank layer below your element that you wish to create the custom shadow for.

- Click on the Thumbnail of the element you wish to create your custom shadow for. This will select the element. You will see “marching ants” around the element, confirming the element is selected.

- Click on the Blank Layer that you created to select it. Go to the top Menu Bar and choose: Edit > Fill > 50% Gray. Click OK. Click Control + D to deselect your element. Now you have a “shadow” (the 50% gray) on it’s own layer, ready and waiting for you to manipulate in your favorite way to create your custom shadow. I used the Warp Tool on the shadow of the flourish, pictured below.

For Photoshop Elements users:
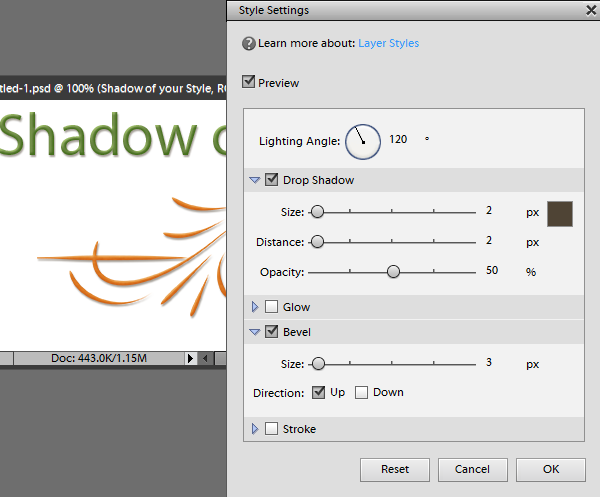
- In PSE you will need to double-click on the “fx” style icon on your layer to open the Style Settings box.
- If you do not want a drop-shadow, remove the check mark in the Drop Shadow box.
- If you would like to modify the shadow, you may do so here. You have the option of changing the size, color, distance, and opacity of the Style’s shadow.
- You may follow the same method, as described above, for creating a 50% gray layer to manipulate. PSE does not have a Warp tool; however, Kimberly, of Kimberkatt Scraps, wrote a tutorial “Creating Custom Shadows in Photoshop Elements,” that I’m sure you will find helpful!
Shadows can make or break a layout. They can be tricky to get just right. I hope this tutorial has given you some tools to get started on your journey.
If you prefer not to go through the steps required to get a shadow on it’s own layer, Boop Designs has an Editable Drop Shadow Action available that works perfectly in both CS and PSE.
It’s Labor Day Weekend! Visit both our Personal and Commercial Use stores where you will be able to choose your favorite kits and tools to practice with, and save while doing it!


If I am shadowing over a color, I choose that color rather than gray, for my shadow. Then I can manipulate the saturation and opacity after I have the shadow. Then I use gaussian blur to soften it, and multiply or linear burn blend mode. Thank you for the tutorial. I forget about this method for getting the shadow on its own layer.
Hi Peggy, yes, those are excellent options once you get your shadow on it’s own layer. Thanks for sharing.
[…] The Shadow of your Style – 1 freebie(s)? […]
You are so clever! I have had to alter a drop shadow before and it was definitely not this easy! LOL
This is what I did. I create a new layer, above the layer I am wanting to mess with is fine. I moved all of the styles/effects from the layer where I want to alter the drop shadow, to the blank, or ‘dummy’ layer. Keep the drop shadow – don’t move it. After the other later effects are moved, hover over the downward pointing arrow on the far right of the original layer, or, over the ‘fx’ and select ‘Create Layer’. A tiny window will pop up saying something about the changes – click ‘OK’. This will put the drop shadow on it’s own layer – just below the original layer. Finally, go to the ‘dummy’ layer and move the effects back to their original spot. Then, delete that blank ‘dummy’ layer.
See what I mean? But, there may come an occasion where this might be handy. Or, not. LOL
Thank you for another one of your marvelous tutorials!
Su
Thanks for sharing Su. I have done something similar in the past. There are so many ways to do things… the beauty of Photoshop!
That is fer shur! LOL I learned about temporarily dragging effects to a Dummy Layer from one of the PS Gurus, can’t recall who. I thought it was a neat tip to know.
Thanks, again!
Su