I don’t know about you, but I prefer my photos with natural light. Sometimes my kids are in the perfect position for a photo and I don’t have time to play with the settings to get the right shutter speed and aperture…and frankly, I am not a photographer and don’t know what the right settings should be…so I stick my camera on portrait mode and often end up with a yellowish cast from the lights in my house. I don’t worry about it anymore, not since I learned this great and really easy fix for that and other funny lighting situations!
I snapped this closeup of my baby the other day, and I loved the look on his face, but look how awful the lighting is….
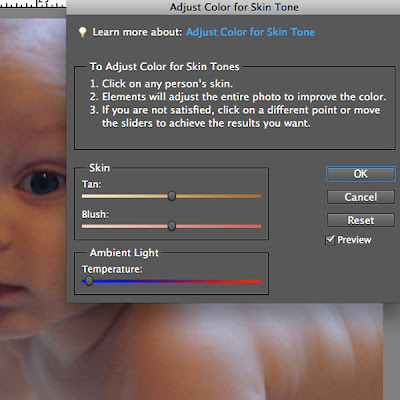
Let’s let PSE work some magic! (In this I’m using PSE10, but I know these settings are there at least as far back as PSE6.) Let’s go to Enhance –>Adjust Color–>Adjust Color for Skin Tone
These dialog boxes can be confusing, but in this one all you do is click on some skin in the photo. I’ve already clicked on my son’s face (the skin I most wanted to look right) and you can already see it looking better!
Really, it was probably good enough, but I am going to slide the tan bar a little to the right to bring down the blue tone in the photo just a little bit. My son has a slightly darker complexion, and this will help. Depending on the skin tone of your subject, you may need to slide it another direction – or if you have rosy cheeks or that red tone in a newborns skin, you may want to slide the Blush bar to make sure those look right! When the photo is looking good, click OK.
That’s it. You’re done! Look at the difference! You can see the natural sun behind him, his skin isn’t looking so yellow and the whole look of the photo is much nicer! It actually took me much longer to write this tutorial then it did for me to fix this photo!
If you use PS and not PSE, check out the tutorial Steph did on adjusting levels to get a similar look!
— <3 Mandak Nibbles Skribbles Products available at: theStudio PU and theStudio CU


Wow! What a difference, and with such few steps. Thanks for the great tip!
I cannot tell you guys how much these tutorials are helping me!!! And I like (& appreciate!) the fact that you’re showing me FAST ways to do the editing…I’ve been spending more time editing than actually scrapping & I don’t want to do that! I’ve also convinced 2 of my friends (who are even more new to PSE & the digi world than I am) to follow along & learn…THANKS!!!!
I like that your using PSE10 as that is what I jumped in with a couple of months ago. I tag places that give tutorials using Element 10. Thanks.