 When creating scrapbook pages, we often find the need to fasten papers, photos, or embellishments together. Using a Stick Pin, Safety Pin or other similar items work well for this, but creating a realistic look can sometimes be tricky. As with all things Photoshop, there are multiple ways to accomplish this task. Today I would like to share with you my favorite way.
I am using Photoshop CC for this demonstration, but the techniques mentioned will work in Photoshop Elements as well.
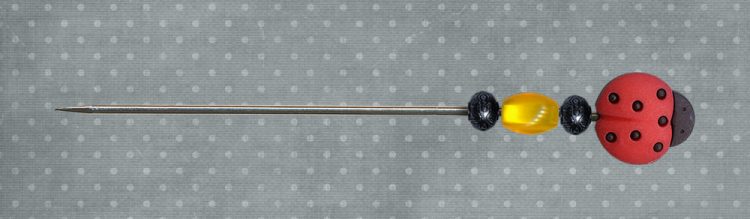
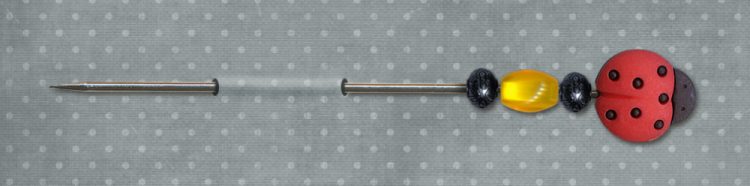
Let’s start with this stick pin and paper from Lady Bug, Lady Bug.
- Click on the Lady Bug Pin layer to make it active. Click on the “Add Layer Mask” at the bottom of the layers panel.
- Select the Rectangular Marquee Tool and draw a rectangle on the part of the pin shaft that you would like to have “pinned” under the paper. Set your foreground color to black. Click on the Mask that has been applied to the Pin, and hold down the Alt Key, and hit Backspace. Your document should now look like this:

3. Select a Background Color with the Color Picker to serve as the color for your pin holes. This is personal preference. Some like black, some gray, and some like a darker shade of the paper they are using. I am going to choose a darker shade of the paper pictured here.
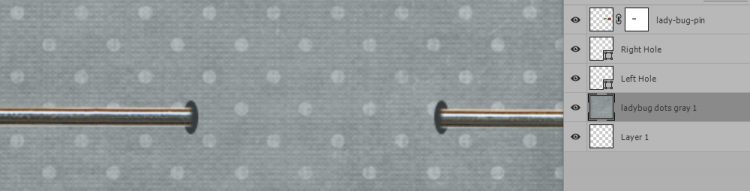
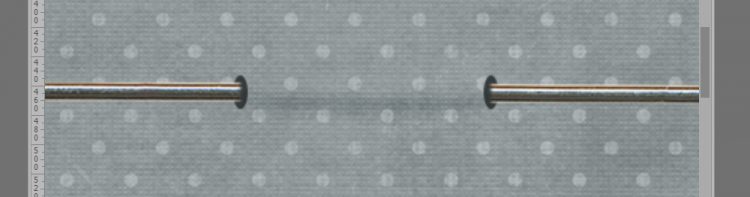
4. Click on the Background Paper layer to make it the active layer. Select the Ellipse Tool. Draw out an ellipse slightly larger than the shaft of the pin. The ellipse will be placed on a new layer above the paper layer. Name this layer Right Hole. Repeat to create a left hole.
5. Add 2 blank layers above the Hole layers. Fill each layer with 50% gray. Label one layer Dodge and the other Burn. Change the blend mode of the 2 new layers to Overlay.
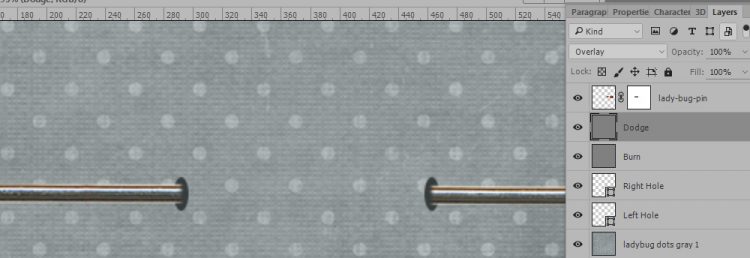
6. We will use the Dodge and Burn tools to create the effect of the pin being under the paper. Using the 50% gray layers will allow us to Dodge and Burn non-destructively. (How to Use Dodge and Burn Non-Destructively). The Dodge tool will lighten; the Burn tool will darken. Select a soft-edged brush about 2/3’s the size of the ellipse that you drew. Set the Hardness of the brush to 0%. Select the Burn Tool; select Midrange in the top options bar; set the Exposure to between 10-15%. Having a light exposure will allow you to build the Burn effect as you brush. Position your brush at the bottom of one ellipse, and drag to the bottom of the other ellipse. Don’t worry about getting a perfectly straight line. You should end up with something similar to this:
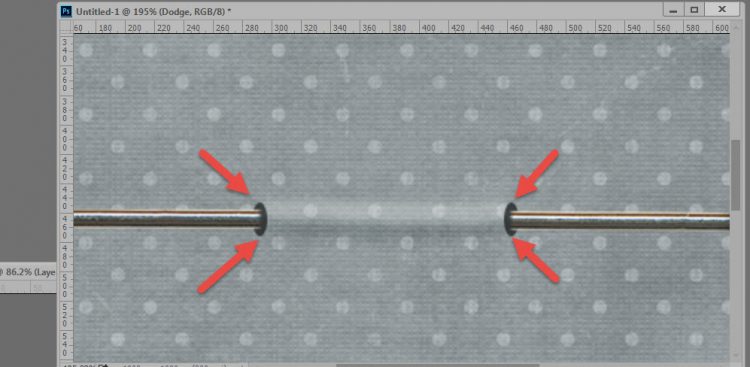
7. Switch to the Dodge Tool. Click on the Dodge layer in your layers panel to make it active. Change your foreground to color white. Using the same brush settings as you used to Burn, drag from the top of one ellipse to the other. Keeping your dodging and burning level with the top and bottom of the ellipse’s will keep things looking realistic. Dodge and Burn to your liking. If you make a mistake, just paint your mistake away with your brush using 50% gray… or just fill the layer with 50% gray and start over again.
8. Apply a shadow to the Pin. Because the pin is close to the paper, the shadow will be close to the pin and slightly dark. I have applied a shadow distance of 4 px and a size of 7 px. (Drop Shadow Styles for Stitching, with the opacity bumped up to 85%.) (How to Adjust Drop Shadows).
9. Some scrappers like crisp clean holes, while others prefer a more “imperfect” look, so here is an additional chance to get creative. On the left hole, I brought up the Transform Tool (Control + T), right-clicked to choose Warp. I made the hole less defined by pushing it toward the pin and squishing the bottom of the hole closer to the bottom of the pin shaft. If you like a cleaner look, you might prefer the right. I applied a Bevel and Emboss with these settings: Outer Bevel; Smooth; Depth 20%; Down; Size 4px; Soften 0 px, and also an Outer Glow of 35% Opacity; size 7px. These measurements will change with the size of pin you are working with.

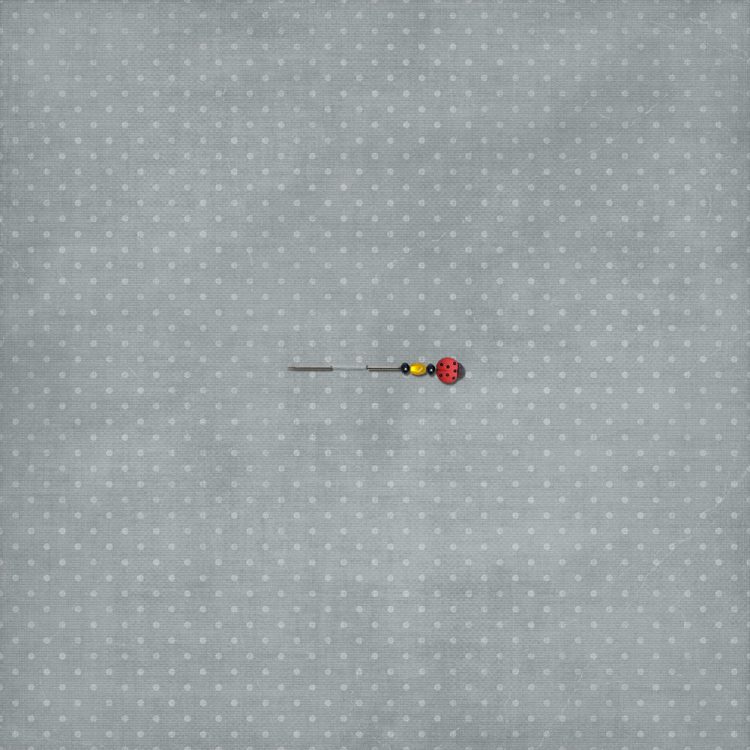
Warp, mask away, squish and/or distort the pin holes until you are happy. Truthfully, they won’t be very visible on your layout because they are so small, so switch your View Print Size (Top Menu Bar) before you spend too much time fussing with the holes. Here is the pin as it would appear on a 12″ x 12″ paper.
That’s it! I hope you have found this tutorial helpful! Thanks for reading.
If you would like to keep this tutorial on your computer for easy reference, you may download a PDF here: How to Add a Pin to Paper in Photoshop.
If you are a visual learner, you can view this tutorial on SnickerdoodleDesigns YouTube Channel and on theStudio’s YouTube Channel.
Please head over to YouTube and take a minute to Follow both channels. Each Channel will have some exclusive videos, so by following both channels, you will be sure not to miss a thing!


Thank you. I have wondered how you clever people do this! Hopefully, I will get brave enough to try it.
Thank you so much for this information. Always wondered how this was done. I am going to try this out.
Thank you Margaret and Ann, for your comments. I’m sure you can do it! Watch the video if you are a visual learner – and there is a PDF download for physical reference. Have fun!
I loved this one. It actually looks so real with the pin in the paper. Thank you so much. As always I truly appreciate receiving the PDF file too; thank you.
Thank you, Carol! Thanks also for letting me know you find the PDF useful! I’m glad to know that.