This is the 3rd tutorial in our Photoshop Brush series. If you are just tuning in and watch to catch up with us, here are the links to the previous tutorials:
Today we will look at how to customize a Photoshop brush. This is a great way to extend the use of the brushes you already own.
Today I am using PSE15, but believe that most, if not all, of these options, are in previous PSE versions as well. Photoshop CC2017 information is at the end of this tutorial.
- Click the Brush tool to select it. (It is located in the Tools panel on the left, in the “Draw” section.”
- You will see the brush options in the Options Panel at the bottom of your screen.
- Be sure you have selected “brush” and not the Impressionist Brush or Color Replacement brush.
- Select the brush you would like to use by clicking on the down-pointing triangle next to “Brush.”
- You may adjust the Size and Opacity of the Brush in this Options Panel.
- You may choose to apply a Blend Mode to the brush here as well. (“Mode”). (Tip: When you select a Blend Mode here, you are “stuck” with it. It’s best to avoid this option and to experiment with Blend Modes in the Layers Panel, once you have stamped your brush, where you can easily change or remove Modes as you like.)
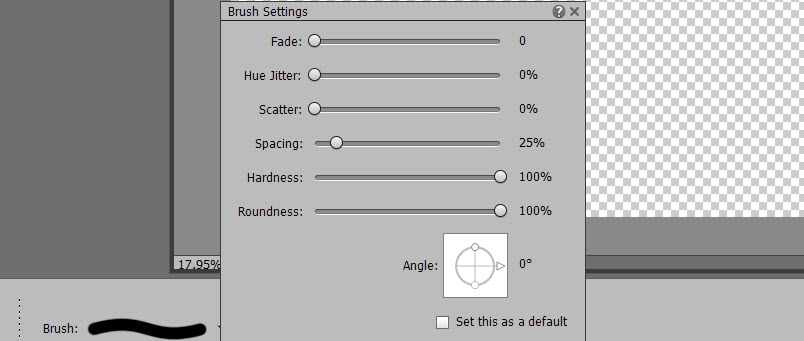
- Click on “Brush Settings” to open another options panel. Here you can change the:
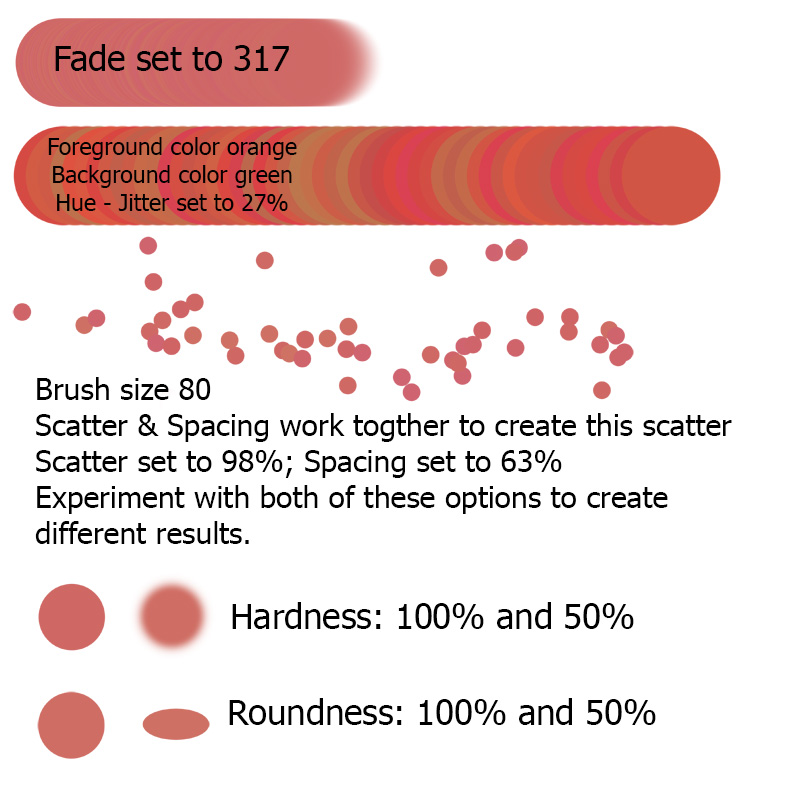
- Fade: Controls the fade of the color as you drag the brush across the canvas
- Hue Jitter: Mixes the background color with the foreground color in different degrees as you drag your brush
- Scatter: Creates a scatter of the individual brush impressions
- Spacing: Controls how far apart the individual brush impressions are from each other
- Hardness: Controls how hard or soft the brush edges are
- Roundness: Controls how round the brush tip is

Choose a brush in the Options Panel

Click on Brush Settings to open other options.

Examples of each option.
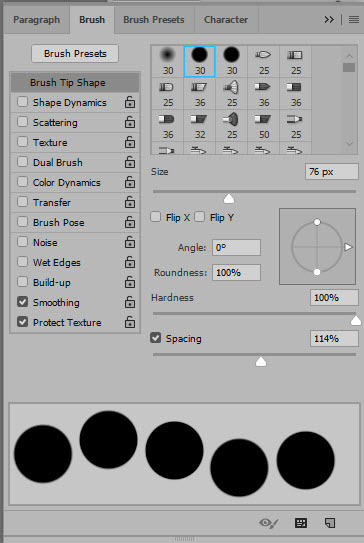
The full version of Photoshop offers additional ways to customize brushes. This is a screenshot of the Brush Panel in CC2017. To access this: in the top Menu Bar: Window > Brush.

Just like in PSE, you have the option of changing the size, Roundness, Hardness, and Spacing and Scattering of your Brush. There are additional options too though, that are fun to experiment with. When you click on one option on the left, another panel will open on the right, giving you specific choices for that option. Experiment to see what each option and sub-options will do for you.
The important thing to remember is that any custom settings you have chosen are only temporary. If you want to save your new brush, you must save it via the Preset Manager: Edit > Define Brush Set. Give your brush a name, and click Ok. The brush is now saved; however, if you would like to have it available to load at any time, go back to the Preset Manager: Edit > Presets > Preset Manager. Scroll down to your new brush, click on it, click on “Save Set.” You will be asked to name your brush and where you would like it to be saved. Click Save, and you’re done. Now you will be able to find your new brush the next time you want to use that same preset.
To my knowledge, you cannot save custom brushes in Photoshop Elements; however, as a work-around, if you create a new brush that you would like to use again, record the Brush Settings that you chose so you can replicate the brush in the future.
If you would like to download a PDF of this tutorial, you may do so here: How to Customize a Photoshop Brush.


Another Great tutorial, thank you
Thank you, Faith!
Thanks for posting this. With brushes that are not round, you can also set the angle of the brush stamp in the Brush Settings panel. The arrow on the right side of the circle controls it. Just click and drag around the circle. This is true in both PS and PSE.
Yes, true, Deborah. Thanks for that addition.