After my last tut on Selective Coloring, I thought a follow up about how to change colors would be useful. I set out to write a tut about the color replacement tool only to realize that I didn’t really know that much about it. I always just used the preset settings when using the tool, and I have to admit, sometimes I didn’t get the results I wanted. There is a lot to this tool, but thankfully, it’s not confusing or hard to use. Score! Today, I’d like to introduce the tool to you and how to use it.
Where It Is
You find the color replacement tool under your Brush tool. Hot key “B”. You will have to activate the fly out menu to find it. Please note: In Photoshop CS3 and CS4, the Color Replacement Tool is nested under the Brush Tool. In CS and CS2, it’s under the Healing Brush.

The color replacement tool looks kind of like a bulls eye. A circle with crosshairs in the center. You can adjust the size of the bulls eye with the Brackets “[” or “]”. To adjust the hardness of that brush, simply add a shift to the “[“.
How it Works
As you drag the Color Replacement Tool over your image, Photoshop continuously samples the color that’s directly under the crosshairs. This is the color that will be replaced, and it will be replaced with your current Foreground color. Any pixels that fall within the larger circle surrounding the crosshairs that match the color being replaced will have their color changed. For example, if you pass the target symbol over an area of blue in your photo and your Foreground color is set to red, any blue pixels that the larger circle passes over will be changed to red. Make Sense?
Try It Out
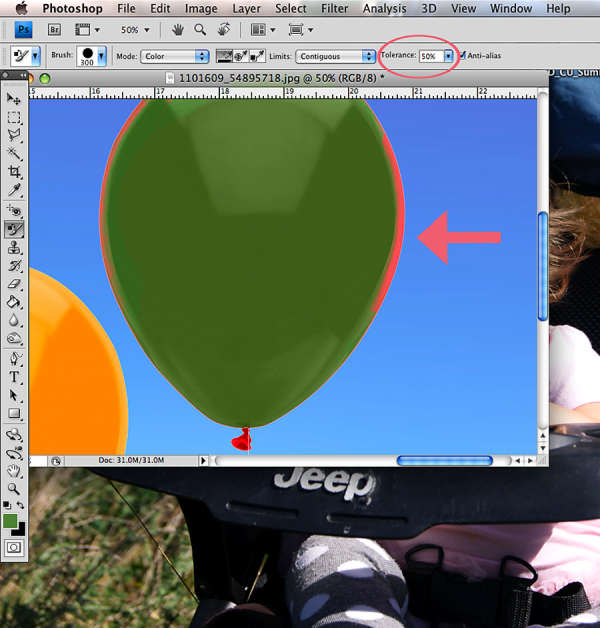
I have a stock photo of 2 balloons.I want to change the red balloon to green. So drag my bulls eye over the red part, but wait? What is that red along the edge not changing color? There are several options when using the color replacement tool. One we are going to talk about today is the tolerance. The Tolerance setting determines how different a color can be from the sampled color for Photoshop to replace it with the Foreground color. The default is 30%. Unfortunately, it’s not quite high enough in this case for Photoshop to be able to include the shade of red right along the edges of the balloon. Let’s increase my Tolerance to 50%, which will allow the Color Replacement Tool to affect a wider range of color

I can now get the edges just like I want them.
Go and try out the color replacement tool! It’s fun to play around with. Next week we will delve a little deeper into the tools options, such as blending modes and Sampling Options. You don’t want to miss it. It will change how you recolor things for ever! 🙂


Leave A Comment