In this week’s set of tutorials on Photoshop Elements – the Ultimate Basics, we have learned how to create a blank document, and how to create our very first scrapbook page. Today I will be showing you how to add text to your page.
There are multiple reasons why we choose to create scrapbook pages, one of them being to document events in our lives and the lives of others. We might choose to include an entire page of journaling, maybe just a paragraph, or sometimes simply a date.
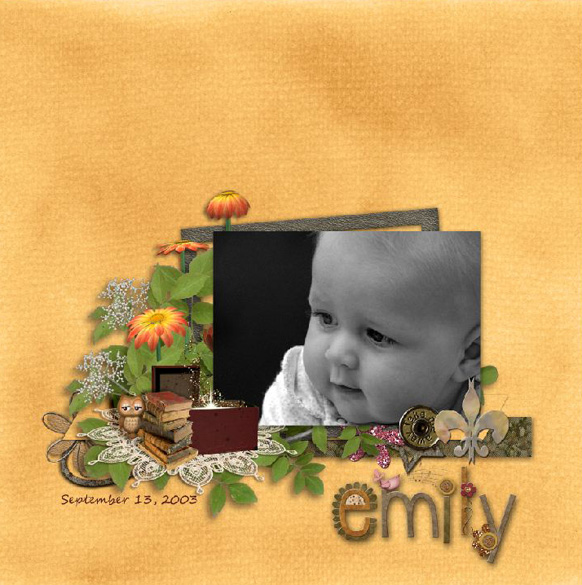
While you were working on your own pages, I added my granddaughter’s name to my page, using my Granny Finch Alphabet. I want to keep this page simple and clean, so will now only add a date. I will do this using the Text Tool.
On the left of your screen is your Tool Bar. That’s the long vertical bar with all of the little tool icons on it. The 9th tool down is an icon with a “T” on it.” This is the “Text Tool.” Do you see the little black triangle in their lower right corner of some of the icons? That indicates there are additional options available for the tool. The “T” does have a triangle. When we click on it, a fly-out menu opens, which shows us our choices.
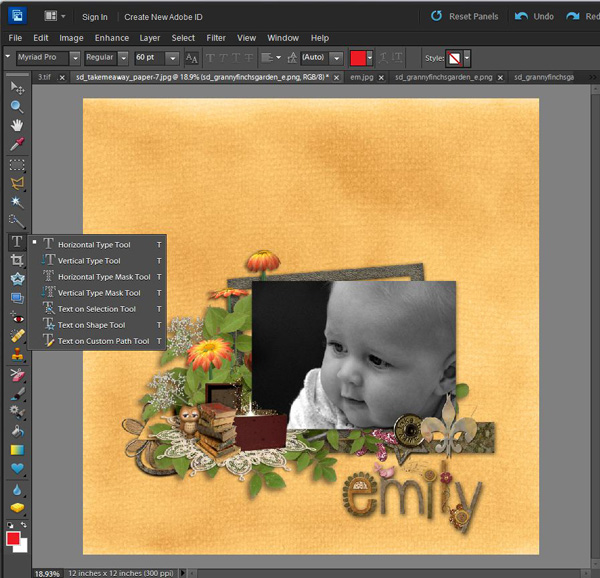
There are 7 text options for us to choose from. Today we will focus on the Horizontal Type Tool only.
Did you notice that when you clicked on the Type Tool to make it active, changes occurred in the Options Bar at the top of your screen? Let’s take a quick look at those.

First you have the option to change the Font type and size. This screen shot shows that I have Myriad Pro, Regular Font selected, and that my font size is set at 60 points.
The AA indicates that anti-aliased is selected. This will keep letters smooth and as free from jagged edges as possible. We want that, so make sure it is selected.
The next option is indicated by the presence of four “Ts.” Hover over each “T” to see what option is available, then just click on one of the T’s if you would like to select that option. (The options are: Faux Bold, Faux Italic, Underline, and Strikethrough).
The next icon, with the down pointing white triangle, is your text alignment option. Click on the triangle to see your choices: Left Align Text, Center Text, Right Align Text. Just click on the option you would like to use.
The Leading Menu is next and is indicated by the two capital A’s, one on top of the other. This tool sets the space between lines of new or selected text. Play with this option to add some extra interest to your text lines. Sometimes it can be quite effective.
The Text Color menu offers you color choices for your selected text. Click on the down pointing white triangle to open the color menu, click on the color you want to use, and it will be applied to your selected text. Alternatively, choose a text color before typing your text, and your color selection will be applied to the text as you type.
The “T,” with the curved line beneath, is the icon for Warped Text. This will not be an active option for you until you have text on your page. Type some text, click on this icon, and see what options are available for warping your text. This is a fun tool to play with!
And finally the last icon, the “T” with one arrow pointing down and one arrow pointing to the right, is the tool which will change the orientation of your text; vertical text to horizontal and/or horizontal text to vertical.
The green check will commit (apply) your text choices.
Now let’s get back to my scrapbook page. I will click on the “T” in the Tool Bar, to make the Text Tool active. In the fly-out menu, I will choose Horizontal Type Tool, because I want my text in the horizontal position. When I start typing on my page, a new text layer will automatically be created in the Layers Palette. I want the text on the top of my layers, so I am going to click on the top layer in my Layers Palette to select it. Now when I start typing, the new text layer will be placed right above the selected layer.
The date of this photograph was September 13, 2003, and that is what I will type. But wait! I want the color of the text to match the red color of the box in the cluster. I will go up to the Text Color box in the Options Bar, click on it and the Color Picker will open. I now have 2 options: (1) I can choose a color within the Color Picker by moving my cursor around, then clicking OK when the color I want to use is visible in the “new” box, or (2) I can move my cursor onto my scrapbook page, move the cursor (which becomes an eye dropper tool) to the color I want to select, click on it, and then click OK. My color choice will now be the active color in the Text Color Picker.

Next I will just click on my page in the general area I would like to add my text. Once I type the date, I can move it around until I am happy with its position. To “commit” the text, I can (1) click anywhere else on the layout, (2) click on the text layer itself in the Layers Palette, or (3) click the green check mark in the Text Options bar.
So take your time… add some journaling to your page, and tomorrow we will save our pages!


Great layout…BEAUTIFUL Granddaughter!!!!! Thanks for the the tutorials on the basics…I’m learning a lot!
Thank you, Donna! Both for letting me know the tutorials are helping you and also for the compliment on Emily. 😉
I hope Studio members will want to zero in on the basics of Photoshop in my online FUNdamentals of Photoshop Class which will start mid-April (3 months). When you have full command of the tools in Photoshop, and can post-process your pictures so that they are perfect—these tutorials will be even more meaningful and your digital scrapbook pages better and better.