Over the past 2 weeks, we have been discussing Photoshop Styles. In case you missed those posts, you can catch up with us here:
Today, we are going to explore adjusting pattern sizes in Photoshop Styles. For the purposes of this tutorial, I am using Photoshop CS6. This method should work in other full versions of Photoshop. We are not able to access Patterns in Photoshop Elements.
As we discussed last week, most Styles will have a pattern to them, which is what gives them their distinct personality. (Not all Styles will have a Pattern Overlay, but we are going to focus today only on those that do.)
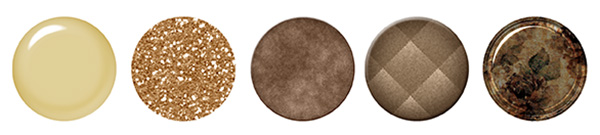
Here are the styles that we looked at last week. Notice the distinct pattern each one has.
 Stratified Rock, Marble, Chipboard, Leather, Rusted Metal and Snow & Ice
Let’s take a look at the pattern in the Stratified Rock Layer Style. I’ve turned off the Bevel & Emboss, and the Inner Shadow, so we can focus on just the Pattern Overlay.
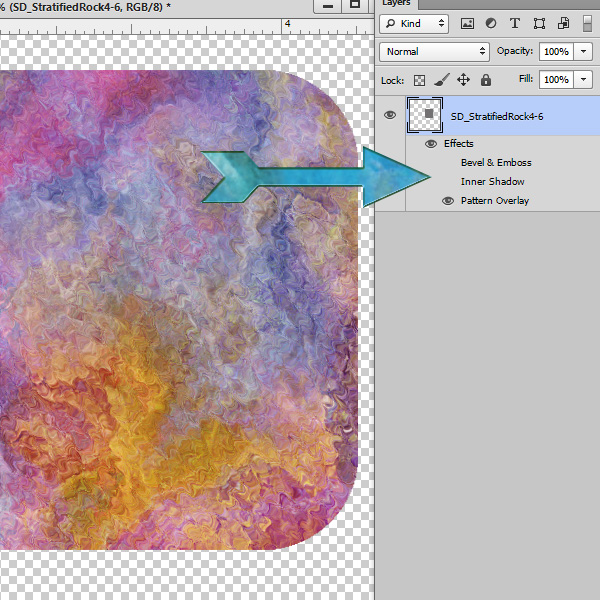
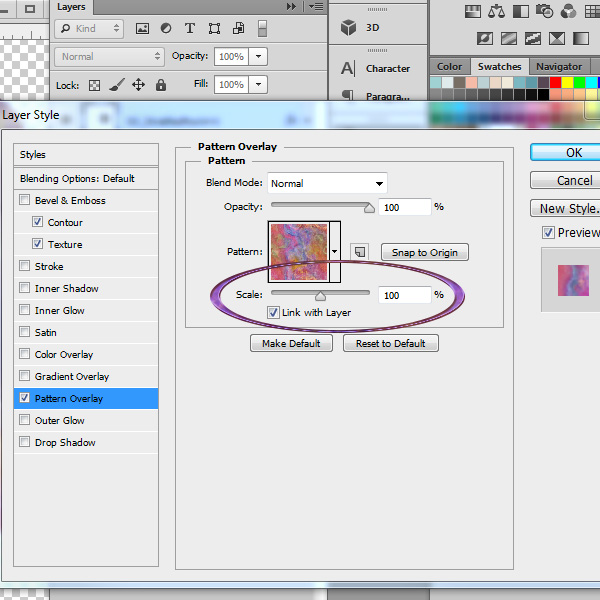
In the Layers panel, double-click on the Style to open the Layer Style dialogue box. Next, click on the Pattern Overlay to make it active. Then, on the right, we will now see the additional options for the Pattern Overlay. Note the “Scale” option toward the bottom. We see that the Scale (or size) of the Pattern Overlay in this Stratified Rock Style is set at 100%.
By adjusting the slider, we can make the pattern larger or smaller.
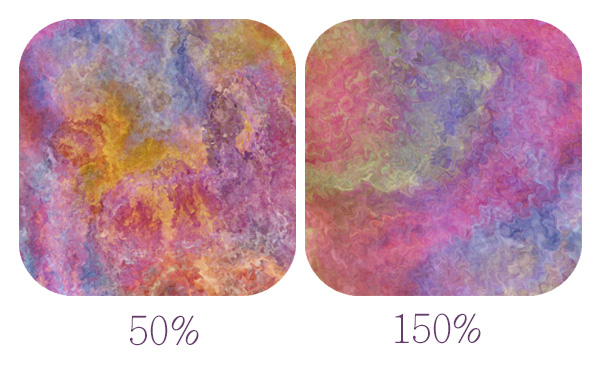
We have to be careful when adjusting pattern styles, because they can get blurry very easily. The Stratified Layer Styles don’t show much distortion, even at 150%, because of the overall blended look of the pattern.
Here is the Rusted Metal Style at 50% and 150%:
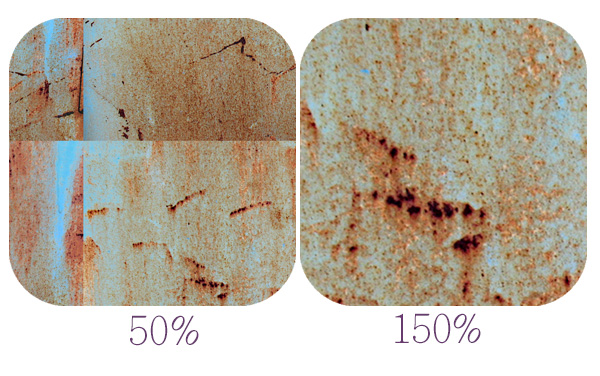
The Rusted Metal Style is not “seamless;” therefore, when we make the pattern size smaller, we are able to see the seams, where the (repeating) pattern edges meet. (See Exploring Patterns in Photoshop for reference to this concept, if it is new to you.) We can see that this pattern is significantly blurry at 150%.
So why would we even want to adjust pattern sizes, since they are set to their ideal size during their creation by the designer? There could be several reasons.
- You might like to apply a large-patterned style to a small element, where a smaller pattern would look better. Sometimes scaling a pattern to a smaller size can cause distortion, just as scaling it to a larger size can; so just double-check the clarity of the pattern whether you are scaling up or scaling down.
- You might be using a style that is not seamless, on a shape that is just slightly larger than the pattern itself. By increasing the pattern size, you would avoid seeing the pattern seams.
NOTE: If the designer of a style has applied a texture to the style, and you scale the pattern, your scaled pattern may look a little funky. It really depends on what texture has been applied. This is a more advanced topic that we can talk about another day.
Ideally, whatever Styles you use are perfect for your needs, but it’s nice to know a few little tricks when you need just a slight adjustment. This is one such trick. Next week we’ll talk about how to move around a pattern that is contained within a Style. This can be especially helpful when working with a pattern that is not seamless.
I have a Styles Sampler for you to download and experiment with. Open the Styles and scale the patterns up and down yourself to see what results you get. Although this Styles Sampler was offered as a freebie about a year ago, some of you may not have it. And I thought the patterns in this sampler were varied enough to provide really good examples of what we have been talking about today.
Click HERE or on the image below to download.
If you enjoy working with Styles, I encourage you to visit the Photoshop Styles category in our Commercial Use store, where we have hundreds of varied styles for your creative use!


Styles are wonderful! Another reason one might want to scale would be to ‘center’ a part of the pattern in a specific area. With your first example, the “Stratified Rock”, providing the pattern is not distorted, you could scale up or down to try to get the part of the pattern showing that you like. This works really well if you ‘move’ the pattern around, but, I’ll not go into that. I know Karen has or will.
Thank you, Karen!
Su
Yes, Karen mentioned she was going to discuss moving the pattern itself in a later lesson—
It will be fun to test how various styles distort (or don’t) as we play with the scaling values the designer conceived this week.
What a great trip down Photoshop Styles (and their effects!) you’ve given us, Karen, and thanks for sharing so many possibilities with them. Your tutorials are terrific and the pot-potpourri of styles practice files are dynamite!
Karen, we’re wishing you a safe and easy move to your new home. Best of luck See you in July 🙂
[…] Adjusting the Pattern Size in Photoshop Layer Styles – 2 freebie(s) […]
Thank you so much for the tutorial as well as the freebies!
Thank you , Karen, for the sample styles. Great explanation although, I have Elements, so I can’t do too much playing. Are you missing the big city yet?
[…] Adjusting the Pattern Size in Photoshop Styles […]