What is perspective, and why is it important to us in digital scrapbooking?
The Merriam-Webster Dictionary defines “perspective” in this way:
a : the technique or process of representing on a plane or curved surface the spatial relation of objects as they might appear to the eye; specifically : representation in a drawing or painting of parallel lines as converging in order to give the illusion of depth and distance.
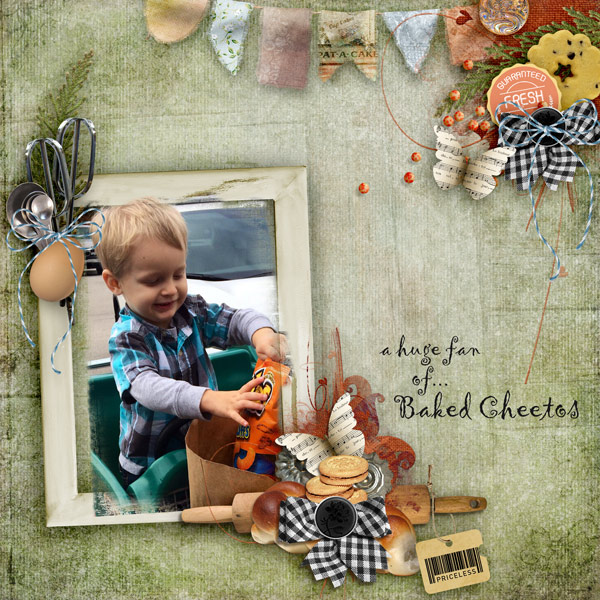
Creating perspective in our scrapbook pages helps make our designs more realistic in appearance. We can create perspective easily by paying careful attention to the size of our embellishments in relationship to one other, and by their placement on our pages. Here is a great example of keeping these principles in mind. This layout was created by Norma, a member of both my Creative Team and that of theStudio, using Oven Lovin’. The size and positioning of the embellishments near the photo frame create great perspective.
When we have just one item, whether it is an embellishment, photo, or paper, that we would like to create perspective with, it’s a little more difficult to achieve this effect, simply because there is nothing else to provide spatial context. In this situation, we would choose the Transform Tool to help us.
We can access the Transform Tool in several ways:
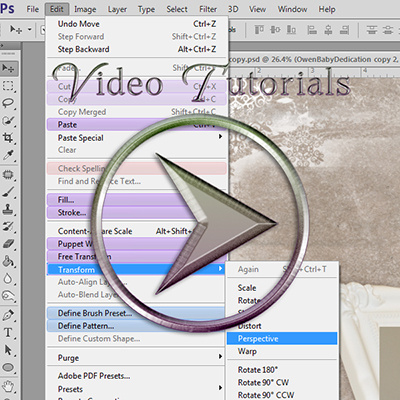
1. In the top Menu Bar: Edit > Transform > Perspective, OR

2. Click on the layer you would like to transform making it the active layer; use the keyboard shortcut Control (Command on a Mac) + T to access the Transform Tool; right click on the selected layer in your document to access the Perspective option.
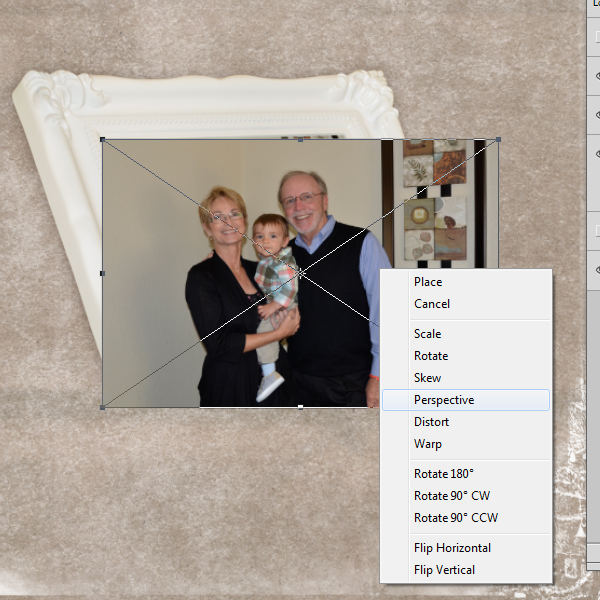
No matter what method you choose to access the Perspective Tool, you will end up with nodules on the corners and on the sides of your selection. By dragging the nodules, you will be able to give your element perspective. When you drag one nodule, all nodules will move as Photoshop tries to guess the perspective you are trying to create.
Things can get really crazy very fast though! In the image below, I moved the upper right nodule slightly towards the right, and the lower left nodule slightly to the left. Yikes!

Thank you, Photoshop, for giving us a much easier way to create perspective when working with just one or two elements, and that is with the “Free Transform Tool” (rather than just the “Transform Tool.”)
You can access the Free Transform Tool like this:
1. In the top Menu Bar: Edit > Free Transform, OR
2. Click on the layer you would like to transform making it the active layer; use the keyboard shortcut Control (Command on a Mac) + T to access the Transform Tool; rather than letting go of the Control key as you normally would, continue to hold it down to access the Free Transform option as you work.
(Photoshop Elements Users: Your path is: Image > Transform > Free Transform)
Here is a frame, with perspective, that is included in my kit, Deck the Halls. Let’s look at how easy it is to give matching perspective to a photo for this frame using the Free Transform tool.

I have resized a photo to make it just slightly larger than the top of the frame inset. (Not a great photo, but it works well for this tutorial. This is my husband, Rick; our grandson, Owen; and me).
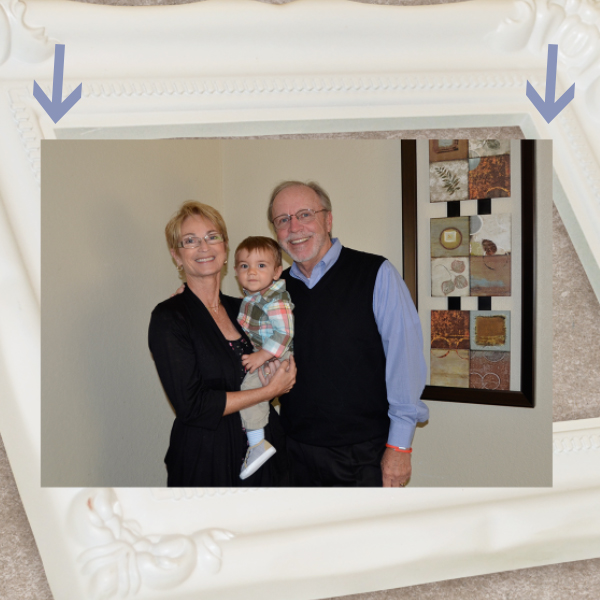
Next I accessed the Free Transform Tool. This tool will allow you to move just ONE nodule at a time, rather than having them all move at once. I then moved each corner into the desired position and hit ENTER to commit the changes. (You can also click on the check mark in the top Menu Bar to commit).

The perspective in the photo, with this frame, looks much better than if we had placed the photo without perspective here.
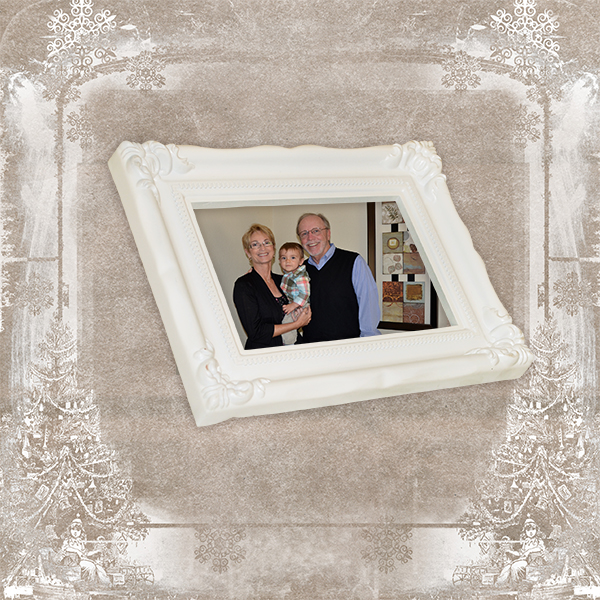
That’s how easy it is!
Next week I will show you how we can use Smart Objects in combination with this tutorial to make layouts even EASIER!
Are you ready for Christmas? Are all your favorite cookies baked, menus planned, food purchased? Don’t forget to take a few minutes to photograph your activities so you will be able to document your memories!
Here is an Oven Lovin’ cluster (with beautiful perspective!) created for you by Norma, to help you get started documenting your holiday baking/cooking!
Click on the image to download.

If you would like to keep this tutorial on your computer for easy reference, you may download a PDF here: Creating Perspective Easily with the Free Transform Tool.
If you are a visual learner, you can view this tutorial on SnickerdoodleDesigns YouTube Channel and on theStudio’s You Tube Channel.
Please head over to YouTube and take a minute to Follow both channels. Each Channel will have some exclusive videos, so by following both channels, you will be sure not to miss a thing! Thank you!!


Another easy to understand tutorial. Thank you
I have trouble trying to figure out which transform tool I need. I’ve used your way, by holding CTRL, but, I keep forgetting about it! Maybe now, I will remember it! Thank you so much! You do such awesome tuts!
Su
Thank you for the tutorial! I like learning new things in Photoshop. I can’t wait to try it!
Here’s an idea for everyone if you have a smart tv, Roku, etc and you add You Tube to your channel list. Go to the You Tube link Karen provided and underneath, there is a subscribe button. Click on it. You can watch all the videos Karen uploads on the TV anytime you want! I love having the You Tube access. I watch the videos I uploaded of my grandson on my tv!
Deloris, thanks for the reminder. I have a smart TV and often forget about available sites. I will definitely add UTube so that I can watch Karen do her thing at my leisure. These senior moments are on a roll. 🙂
You are most welcome! It will be handy to watch it on our TV’s! Hugs, DeLOris
thank you this is very helpful.
Thank you so much Karen for the adorable freebie. That little muffin tin is just like one I had when I was a child. Also, it’s so great that you are now providing the tutorials in PDF format. This way I can keep a copy available to open when I need it. You’re the best. 🙂
Elaina
Thank you so much for the PDF format of this tutorial. Many times I need to go back to a tutorial to refresh my mind as to what to do. I started copying all the info in the tuts and pasting it in Word so I wouldn’t have to get on the internet while working on something. I love your PDFs. You are so great and so thoughtful and considerate to provide us with these. I really loved the video of this tutorial too. Thanks so much for sharing your great knowledge with us.
Also, thank you very much for the cool cluster. Those items were so much like the ones my mother used, wonderful reminder.
Wow! This is one of your best tutorials, EVER, Karen. Thank you so much. Can’t believe how big that little DGS has gotten. GREAT photo and perfectly fabulous layout!
Thank you for taking the time to comment, ladies – and for being specific so that I know what you find helpful. Your words are always an encouragement to me.
I really thank you for sharing your design skills so freely with us so that our layouts will have a professional quality finish. I have used the transform for shadows, but it has been many a years since I used this technique in a layout. (I was using PSP during that time.) Your generosity knows no limit as you provide both visual and written resources for our use. I look forward to the addition of the Smart Object addition to this tool in your next tutorial. 🙂
Great tutorial Karen! Though I have used the transform many times, it’s always good to get a fresh take and a refresher on it.
Thanks also for using my page as part of your “perspective” tutorial.
thank you for the tutorial and the fact that I could download in PDF form to keep. Much appreciated.
I love having the PDF and the video. I have a folder with PDF saved for future reference. When I don’t use a technique very often, it really helps to refresh my memory of the process. And the videos are a great visual tool for remembering! You are adding videos to your training repertoire – what a pro!
Wonderful tutorial as usual, AND the PDF is so much better than copying and pasting into Word.