
When I was trying to decide what to write about today, I thought the best thing to do was ask what you all would like to know! I posed the question on my Facebook Page, and Kristal asked a great question about how to save some styles that she had created.
Kristal wrote: “Styles – is there a way to save them to the desktop etc. I have some shadow styles that I created and want to save somewhere in case PS gets reset but not sure how.”
There is a way, Kristal, and it’s very easy! We do this with the Preset Manager.
The Preset Manager gives us one place to manage brushes, swatches, gradients, styles, patterns, contours, custom shapes, and tools. When we create our own presets, they are only available until we close Photoshop – unless we have saved them! We save them through the use of the Preset Manager.
I am using Photoshop CS6 for the purposes of this tutorial. The process I will be demonstrating today also works in Photoshop Elements (PSE), although the PSE Preset Manager allows you to work with only brushes, swatches, gradients, and patterns.
So let’s begin! Since Kristal asked about saving Styles, we will work with those today, but the process I will describe works the same for all Presets.
Go to Edit > Presets > Preset Manager. The Preset Manager will open.
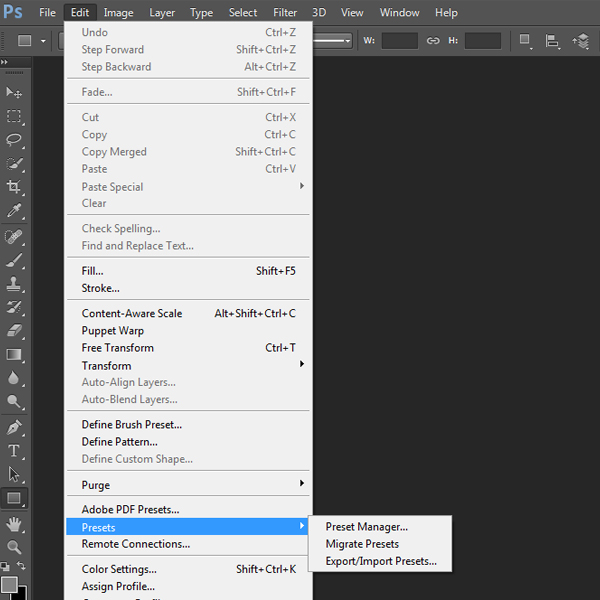
I want to save a set of Texture Styles that I created. By default, the Preset Manager opens the Brushes. I will need to change the Preset Type (at the top of the Preset Manager window) to Styles by using the drop-down box to the right. All of the Styles that are currently loaded in my Photoshop program will be visible now.
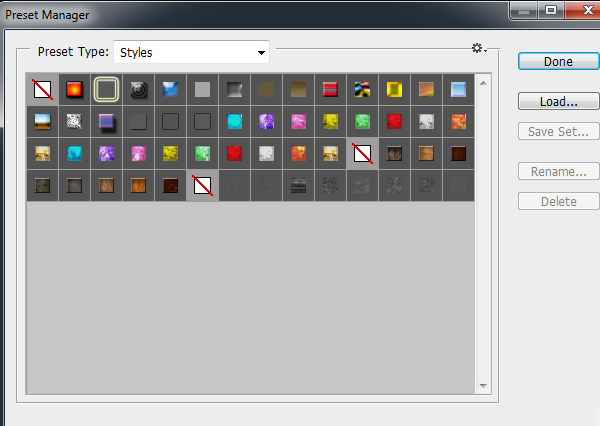
Notice the white square with a red diagonal line. This is a “default” style. It acts as a divider between your style sets. I like to right click on it (which will open a dialogue box) and give it the name of my newly created style. This is personal preference. If you would like to leave it named “default” that is just fine.
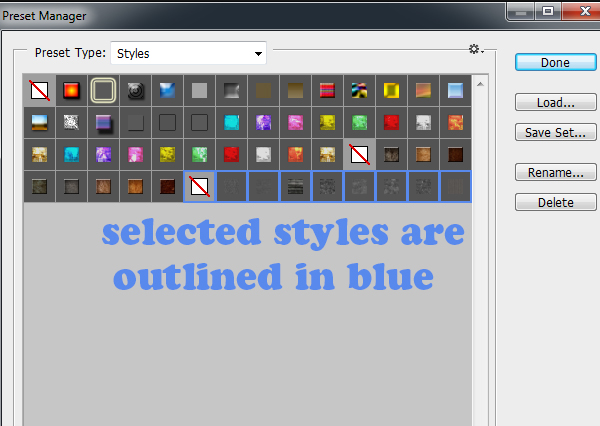
Click on the first style that you would like in your set, hold down the Shift key, and click on the last style that you would like included in your set. This will select all of the styles inbetween those two choices. I have chosen to include the divider default box as my first selection. You will see that is highlighted, as well as the 8 texture styles in this Texture Set.
(As a side note, you may also rearrange your styles in the Preset Manager. Just click on a style and drag it to the position that you prefer.)
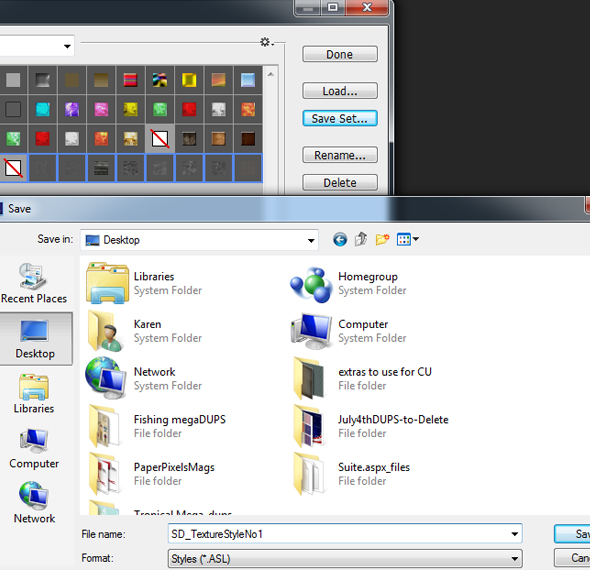
Click on “Save Set” and a new window will open. By default, both Photoshop and Photoshop Elements save to Adobe’s Preset folders. However, you can change this by selecting a new location in the “Save in” box. For the purposes of simplicity, I am going to save this set to my Desktop.
In the same window, at the bottom, you will want to name your new style. I am naming mine SD_TextureStylesNo1. Then click on Save.
And that’s it! Now the next time you open Photoshop, you will be able to access your newly created Style.
If you saved your new style to the Adobe Presets folder, it will automatically be available in your Styles Palette. If you saved it to another location, you will need to navigate to your style by using the Styles palette or simply locate your style and drag-drop it onto your workspace (my preference!). (Drag and Drop method is only available in Photoshop, not Photoshop Elements.)
I hope this answers your question, Kristal! Thanks for the great idea for a tutorial!
And thanks to everyone who reads these tutorials! I appreciate your kind comments and encouraging words!


Leave A Comment