We all have our favorite ways of working, our favorite tools – ones we return to over and over again. What is yours?
Does your favorite Photoshop tool have a Preset, making it faster and easier for you to use that tool? If not, did you know that you can create your own?
In my tutorial today, I will be demonstrating how to create a preset for the Crop Tool; and I am working in CS6.
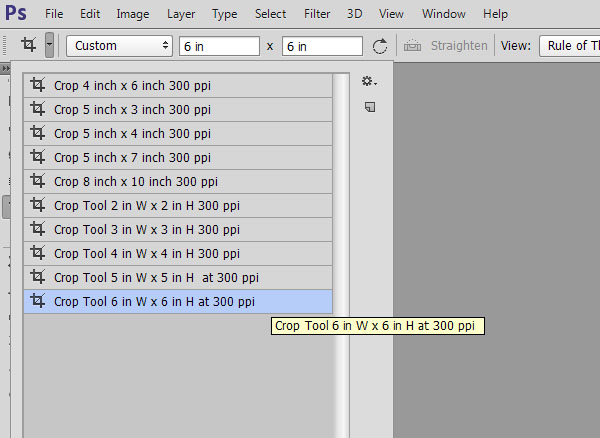
In the image below, I have clicked on the Crop Tool to select it. When I do so, the Option Bar, at the top of the screen, offers me choices relative to that tool. At the far left, you will see the Crop Tool symbol, which tells me the Crop Tool is now active. To the immediate right of the Crop icon, is a darker gray bar, with a down-pointing arrow. When I click on that arrow, a drop-down box opens which shows me that Photoshop has already created 5 presets for the Crop Tool. This can be quite handy!
But I want to create a custom size, so I need to enter information that I want to be saved. Here’s how:
- Click on the Crop Tool to select it.
- Type in the options that you wish to save in the Options bar. (I have typed in 6 inches by 6 inches in my example.)
- Click on the down-pointing arrow on the Tool Preset button on the left side of the Options bar.
- Click on the New Tool Preset button

- A New Tool Preset box will open. A default name will automatically assigned. Click OK to accept it, or type in the name of your choice, then click OK.
- You will see your new preset appear in the Preset Window on the left.
And that’s all there is to it!
If you enjoy utilizing blocking techniques on your scrapbook pages, having crop pre-sets for various sizes can be such a time-saver!
It also can come in really handy to create mats for photos, paper strips.. just anything! So over the next few days, pay special attention to any sizes you may be creating over and over again.. then just create your own preset!


[…] Create your own Tool Presets – 1 freebie(s)? […]
I could save SO much time doing this … thanks for the great tip!!!