For the past few weeks, we have been looking at Photoshop Styles. Here are links to past tutorials, in case you missed one:
- Using Styles to Stretch your Digi-Stash
- Exploring Patterns in Photoshop Styles
- Adjusting the Pattern Size in Photoshop Styles
Many of you have written to tell me that you like that I include, what I call, Style Strips in my Styles products. Many of you have also asked how to make your own Style Strips for Styles you own or ones that purchase from other designers. It’s very simple to do. Here’s how:
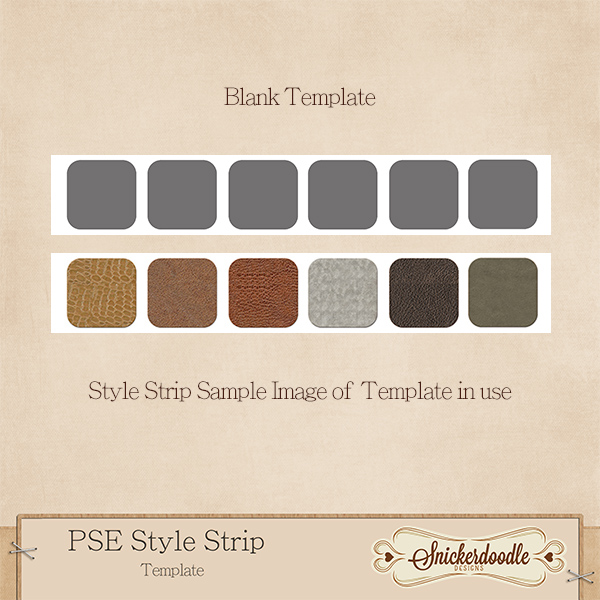
1. Here is a template that I created for my Style Strips. There are 6 squares, and each square is on it’s own layer. You can make your own template with as many or as few squares as you like, or you may download my template for your use at the bottom of this post.
2. Load or install the Photoshop Style that you wish to create a Strip for.
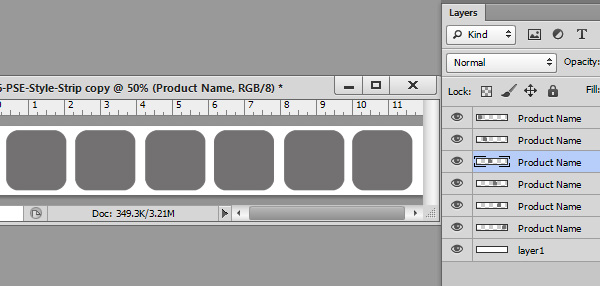
3. Go back to the template and replace the name of each layer (in my preview named “Product Name”) with the name of the Style you wish to create the Style Strip for.
4. With the first layer in the template selected, click on the first Style that is in the Style set you are using. In the image below, you will see that I am creating a Style Strip for my Leather Styles-Set 1, so I have changed the names of my layers to reflect that information. I have also applied the first Style in this Style Set to the first square.
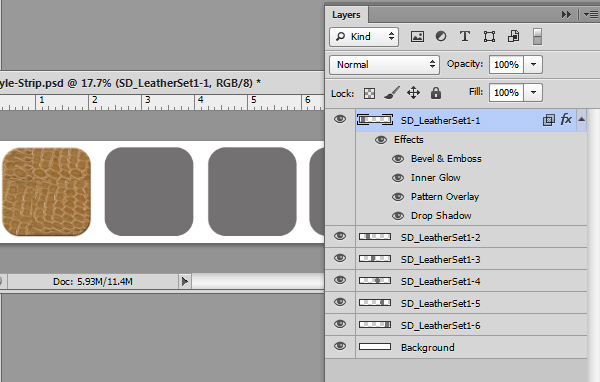
5. To complete the Strip, I would just need to click on the next layer (SD_LeatherSet1-2) to make it active, then click on the Leather-Set1-2 Style in the Styles Panel to apply it to the 2nd rectangle (that is on the 2nd layer); then click on Layer 3, and so on.

6. Once the Strip has been completed, save as a PSD or TIFF, and file it in your choice of places. I like to keep my Style Strips together with everything else that goes with that product (.asl file, tutorials, and such).
Note: If you are creating a Strip that has more than 6 Styles in it: 1. Create a new document (size dependent upon how much space you need); drag the original template onto the new document; duplicate the number of layers (squares) that you need; create your Style Strip; crop the transparent pixels on your new document; and save as noted above.
Using Style Strips is helpful when you don’t want to load or install Styles. Just open the PSD (or TIFF, depending upon how the Strip is saved), right click on layer of the Style you want to use and choose the “Copy Layer Style” option. Right click on the layer you wish to apply the Style to and choose “Apply Layer Style.” Using Style Strips is especially helpful for those who have Photoshop Elements versions that do not allow “loading” of Styles.
I hope this little trick makes working with Styles easy and convenient for you!
Download my template here, or click on the image below, if you would like to use it.


Love your Tools and Tips. You always have the most useful tricks and helpful hints. Thank you for keeping it active. Great stuff.
Thanks Karen. As always – very clear and easily understood. Love style strips – his makes using styles sooo much easier … but I can’t find your strip template or do I just need my glasses on!
Thanks Rarole and Michelle. Michelle, you are right. I don’t think I hit the “refresh” button once I finished the post, so the download was not included. I noticed that this morning, and have since added it. I’m sure I must have done that after you read the post. It’s there now. I’m sorry for the delay!
This is a great way of keeping a record of styles … thank you for the template, it will be so much easier to open these instead of trying to remember what each styles does and then having to load and reload because it was the wrong one 🙂 … I think though if I have more than 6 styles in the grouping I will create the canvas size larger, duplicate layers and bring them down further on the page so I then have enough in one document for that series of styles … hope that was clear lol
Yes, that is another way of doing it Su. I’m not sure if we have talked about increasing Canvas Size (vs. Image Size) here on the blog yet, so didn’t mention this method. Perhaps that would be a good idea for next weeks tutorial.
Oh have you just made my day!!! I so love using your style strips–PSE goes so much faster with using the strips instead of loading and waiting for styles to come up to use a particular style. I especially love having this template–thanks so much. You are such a gift to all of us with sharing your wealth of knowledge in these tutorials. I really appreciate you.
Thank you for sharing the tips & the template. It helps to follow a detailed tutorial such as the ones you share on this blog. Many thanks!
Great tip! Thank you Karen!
A great idea for “storing” all the styles you don’t normally use – without having to buy one of those expensive style viewers! Thanks!
Thank you, Karen, for the best gift ever! This was so very generous of you – can’t wait to get started!
[…] Creating your own Style Strip for Photoshop Layer Styles – 2 freebie(s) […]
Thank you for your comments, ladies! I am really glad that you have found this useful!
You hit the mark every time! Your tuts are always awesome!
Styles, patterns, brushes, the effects are limitless!
If you are going in to re-sizing, could you perhaps add in something about creating an action that would do the resizing, or some of it, at least? There is a way to enlarge a raster image where you increase the dpi and size by percentages, 110%, maybe, gradually, which is the best way to enlarge a .jpg without losing too much of the resolution.
I resize all the time, particularly to bring the resolution up from 72dpi/ppi to 300. I also like an element to be at least 1200px on it’s longest side, so, I enlarge some things for that. Doing it with the percentage way, elements really turn out nice with very little loss of resolution!
But, you write about anything you like – I know we will love it!! LOL
Thank you!
Su