Last week we looked at 3 ways to make selections in Photoshop, using the Lasso Marquee, the Magnetic Lasso, and the Polygonal Lasso Tools. If you missed that tutorial, you will find it here: Making Selections in Photoshop, Part 1. This week we will look at 3 additional ways to make selections using Quick Selection, the Magic Wand, and Color Range. Let’s get started!
Today I am working in CS6, and am using a photograph of my own.
The Quick Selection and Magic Wand Tools are nested together on the Toolbar, in the 4th grouping from the top.
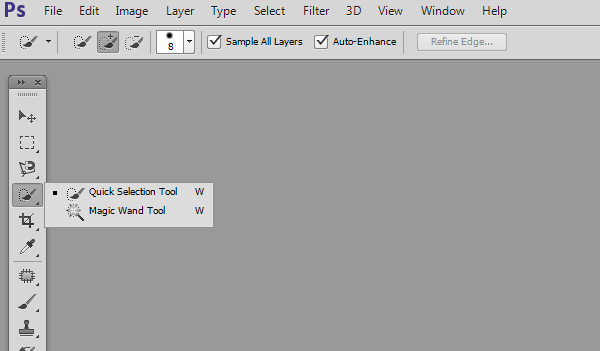
QUICK SELECTION TOOL: This tool creates a selection by finding the edges of an image, as you paint on it loosely. (There is no need to be super careful about going right up to the edges of the object you want to select.)
- Click on the Quick Selection Tool to activate it.
- Use the selection options in the top Options bar to Create New, Add to, Subtract From, and/or Intersect selections. (We covered these options in The Marquee Tools in Photoshop, Part 1.).
- Click on the Brush options to choose your brush size, hardness, spacing and angle (also Pen Pressure if you use a tablet). Experiment with different options to see what works best for what you are trying to select.
- Checking “Sample All Layers” will do just what it says – create the same selection from all of the layers below the layer you are working with.
- Checking “Auto-Enhance” will reduce any jaggies on your selection.
- Paint in your image with the Quick Selection Tool to make your selection.
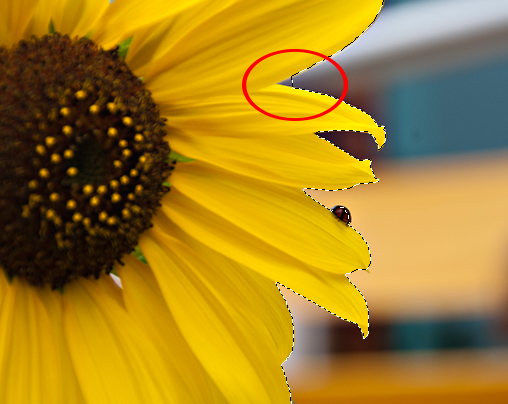
I used a size of 53, hardness 100, and spacing of 70 to create the selection you see below by just painting over the yellow part of the flower. The selection tool did a really good job; however, there is one small area in between 2 petals that didn’t get selected, and part of the ladybug did get selected (which I didn’t want to happen).
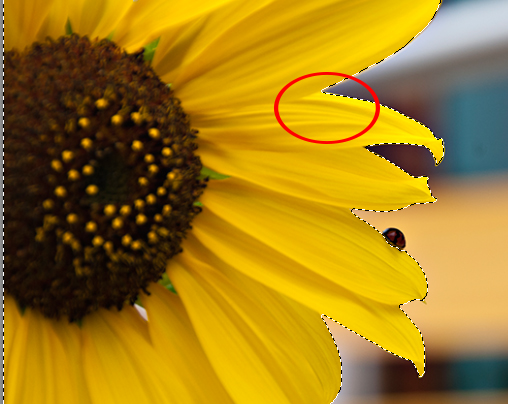
I decreased the size of my brush to 20, selected the “Subtract From” option in the Options Bar, and gently nudged the selection line on the blue part of the image toward the yellow flower. The selection snapped to the edge of the flower. I did the same with the lady bug to deselect it.
MAGIC WAND TOOL: This tool creates a selection based on the differences in brightness value within an image. When we choose to use the Magic Wand Tool, we have some additional choices to make in the Options Bar.
![]()
- Click on the Magic Wand Tool to make it active.
- Make any “Add to,” “Subtract From,” or “Intersect With” choices in the top Options bar.
- Next we are able to choose our Sample Size. I believe this is new to CS6. When we choose a Point Sample and click on our image, Photoshop will find all of the colors in the image that correspond to the color in the Point where we clicked. When we choose a 100 by 100 Average sample, for example, Photoshop will include in the resulting selection all of the colors in the image that are contained within the 100 by 100 sample area.

- Next we can choose our Tolerance. The default Tolerance level is 32. This generally works well. We can change the tolerance value, which ranges from 0 to 255, as we wish. The higher the value, the more variations of your point sample will be “tolerated.” In the sample below I clicked where the red “X” is located, and you can see the differences between the lower and higher tolerance values.

I have played around with both options of Sample Size and Tolerance, and sometimes like the results that one tool gives better than another. My suggestion is to just play around with both options on your image and see what works best for you and what you are trying to select.
- Again, we have the option of checking the Anti-alias box (which I recommend doing).
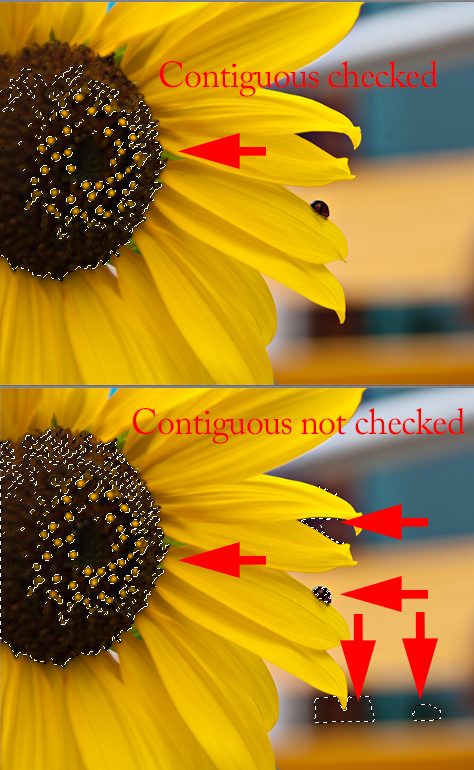
- We also have the option of choosing “Contiguous” in the Options Bar. Checking Contiguous will tell Photoshop to select only adjacent pixels. In the images below I clicked in the darkest part of the sunflower.
- As with the Quick Selection Tool, we can also choose to Sample All layers.
COLOR RANGE: Making selections by Color Range is one of my favorite ways of doing so. The particular method I will explore here is not available in Photoshop Elements, like the Magic Wand and Quick Selections Tools are; however, there is a work-around that I will share with you at the end of this tutorial.
- In Photoshop, to make a selection using Color Range, we need to go to Select > Color Range

- Once we do that, the Color Range dialogue box opens. Here is where the magic happens!
- In the “Select” box, we can use Sampled Colors (the colors we click on), or we can access the drop-down menu and choose specific colors, highlights, midtones, shadows, skin tones, and even out-of-gamut colors.
- If we check the Localized Color Clusters box, our resulting selection will be constrained to the color that we clicked on.
- The Fuzziness slider increases or decreases the color values, or the amount of “color variation” of the color that we click on. The selection that is made is reflected in the black and white image below the Range slider.
- The Range slider allows you to choose more or less of the image that is to be sampled. The higher the value, the more of the image is included.
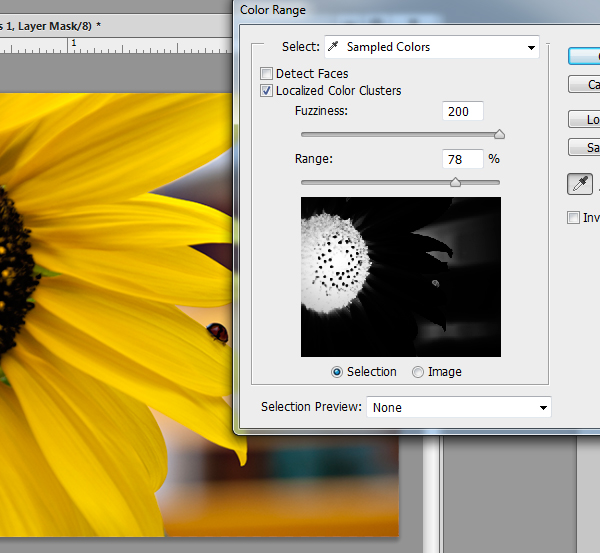
In the image below, I have clicked on the brown center of the flower, and set the Fuzziness to 77%.

What we see reflected in the black and white selection area, will tell us what is being selected. The white part is the selection. Here is the resulting selection, as shown on the photograph:

The dark brown that I clicked on is selected; but I want to include some of the lighter shades of brown also. I decreased the Fuzziness to 49, and that looks much better.
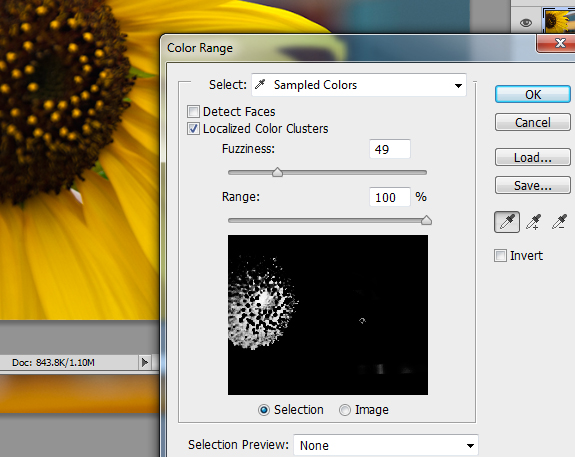
However, the selection still isn’t what I am looking for though. I want to select all of that brown. I can do that by clicking on the eyedropper with the plus sign next to it, and then clicking on the image again, in one of the lighter brown spots. (Alternatively, I can click in the black and white selection box as well, if I know exactly what parts of the image I wish to include in the selection.) This selection is a lot better, as you can see reflected in the black and white box image box.

Because we added more color to our selection, we picked up some brown to the right of the image. We don’t want that, and there’s an easy fix for it.
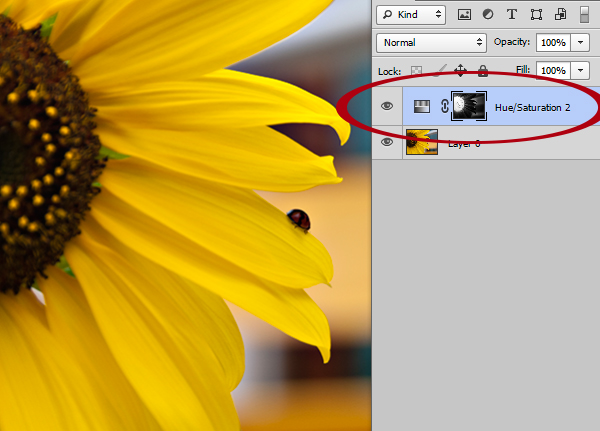
Go ahead and choose Okay to create your selection. You will see marching ants on your image indicating what part of the image has been selected. Let’s make the assumption that you want to change the color of your selection. Click on the Hue/Saturation Adjustment icon in your Adjustments Panel to add a new adjustment layer.
Now look at the layer mask. The white “smears” to the right of the mask indicate the part of the selection that we don’t want. To remove those: select a soft brush, click on the mask to make it active, then paint white on the mask to remove the part of the selection you don’t want affected with your Hue/Saturation adjustment. Once you are satisfied, go ahead and double-click on the little rectangular grey and white box to the left of the mask to make your Hue/Saturation adjustment level active, and then make the color adjustments that you want to make. (Alternatively, you can make the adjustments first, and then paint away, on the mask, the parts that you don’t want.)
Using the Color Range Tools take a little practice, but can be extremely effective in making accurate selections. But as with all tools, some work better than others, depending upon what image you start with, and what your goal is. The key is…. experiment! And if one method isn’t giving you what you want, try another! The more tools we have in our arsenal, the better selections we will be able to make!
This has been a very long tutorial. Thank you for staying with me, if you’ve made it this far!
Disclaimer: This is by no means meant to be an all-inclusive or comprehensive tutorial on selection tools. It is, however, written with the hope that the information presented here will spark your interest in a selection method you may have not considered before, or has created in you the desire to learn more about the tools that you already use.
Photoshop Elements Users: There is a work-around for working with Color Range in Photoshop Elements. The path is: Enhance > Adjust Color > Replace Color. Here is a YouTube video by Jon-Paul Jones that I hope you will find helpful.
See you next week!


[…] Read the rest of this tutorial on theStudio’s blog: Making Selection in Photoshop, Part 2 […]
Thank you so much for this, it makes it so much clearer on what to do to include those evasive pixels 🙂
[…] Making Selections in Photoshop, Part 2 – 1 freebie(s)? […]
[…] SnickerdoodleDesigns has a second part on how to uses the selection tool. Tutorial Making Selections in Photoshop, Part 2 […]
Great wrap up on the selection tools! I wish I had this series when I was first learning Photoshop.
My personal favorite is the Color Range method. I often click on Invert. I use a mask with it, though. That way, if I want, I can tweek away on it.
Thank you!
Su