Last week we looked at Creating Perspective Easily with the Free Transform Tool. We learned how to apply perspective to a photograph in order to match the perspective of a frame. It was a manual process, but very easy to do.

Back in August we looked at Editing Images on the Fly, Utilizing Smart Objects. In that tutorial we learned how easy it is to make changes to elements in our layouts, when those elements are Smart Objects.
Today, let’s combine both of those lessons! Our goal is to quickly replace the photograph in the frame while (1) maintaining proper perspective in the new photograph but (2) without having to manually re-create that perspective, which takes time.
Here’s how:
1. If you used the Place Command to get your photo on your document, the photo will be a Smart Object, indicated by the Smart Object icon in the lower right corner of your photo layer. If your photo is not already a Smart Object, right click on the photograph layer and choose “Convert to Smart Object.” It is critical that your photograph is a Smart Object; if it isn’t the following technique won’t work.
2. Please reference last week’s tutorial on how to apply perspective to your photo.
3. Now that you have taken the time and effort to apply appropriate perspective to your photo, what if you wanted to replace the photo with a different one? You could go through the entire manual process again; but since your photo is a Smart Object, you don’t have to!
4. Double-click on the thumbnail of the original photo in your layer panel. This will open up the original photograph in a separate window. You will see that the original photo does not have the perspective applied.

5. Use the Place Command to place your new photo on top of your original photo, which is in the new window.
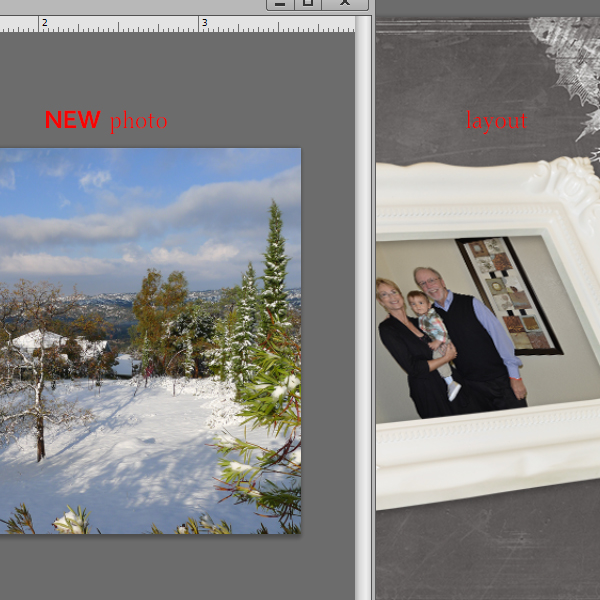
5. While still on your original photo, click File > Save. When you do so, your document will automatically register the change.

Now you have replaced the photograph, the proper perspective has been maintained on the new photo, and literally took seconds!

I love being able to save time and effort with Photoshop tools and/or techniques; but it’s even better when we can combine things we’ve learned to build an even stronger foundation of knowledge!
Credits: The frame and background used in this tutorial are from my kit Deck the Halls.
If you would like to keep this tutorial on your computer for easy reference, you may download a PDF here.
If you are a visual learner, you can view this tutorial on SnickerdoodleDesigns You Tube Channel and on theStudio’s You Tube Channel.
Please head over to YouTube and take a minute to Follow both channels. Each Channel will have some exclusive videos, so by following both channels, you will be sure not to miss a thing! Thank you!!


Great hint!
Love the combination of both visual and written that reinforces the steps explained to accomplish this perspective technique with ease. I just love this additional tutorial which is especially important to me. Short cuts enable me to scrap. Thank you for continuing to share your fantastic techniques with us. You are a blessing. 🙂