
Last week, we talked about the Dodge and Burn Tools in Photoshop (How to Use Dodge and Burn Non-Destructively). I briefly mentioned that the Sponge Tool is nested with the Dodge and Burn Tools. Today let’s look at the Sponge Tool and see how it can be helpful to us in our scrapbooking.
When working with the Sponge Tool, we are working destructively. Any changes we make will change our image pixels, so it’s a good idea to always work on a duplicate image, keeping our original safely tucked away.
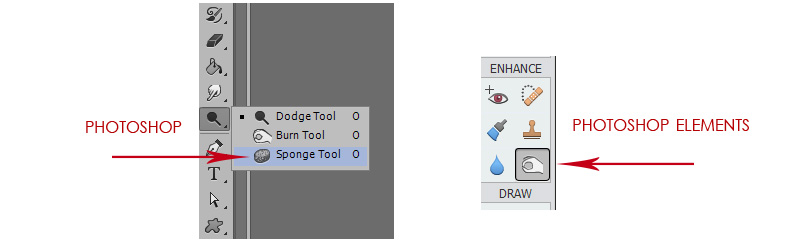
The Sponge Tool is available in both Photoshop and Photoshop Elements, and can be located in the Tool Bar on the left.
The purpose of the Sponge Tool is to either saturate or desaturate an image or part of an image. Once you select the Sponge Tool, you are offered the opportunity to make several choices.
Photoshop:
- Click the down-pointing arrow next to the brush icon in the top tool bar to access the Size and Hardness options.
- Select either Saturate or Desaturate, depending upon the result you are looking for.
- Set the Flow rate, which is the rate of the saturation change (similar to opacity). (I typically start with 50%.)
Photoshop Elements:
- In Photoshop Elements, the Sponge options are located at the bottom of the screen.
- In the options area, choose Saturate or Desaturate, Brush type, Brush Size, and Flow.

Whether you are using Photoshop or Photoshop Elements the next steps are the same. Paint over the areas of your image you would like to either saturate or desaturate. The effect is cumulative, so you may continue brushing to intensify the result, if needed.

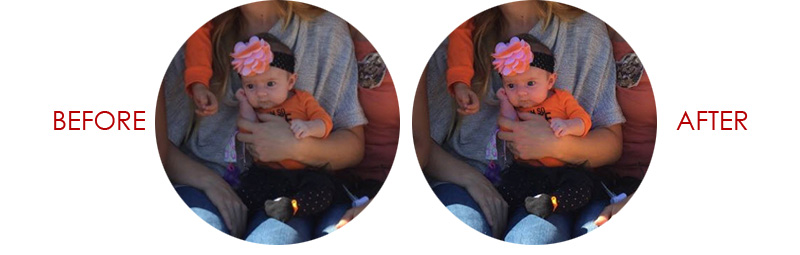
Saturation Example:
In the picture above, the baby is in the shadow of her Mom. I can easily brighten her using the Sponge Tool (Saturate, 50% Flow). This is the result with just 2 clicks:
If any area of a photo is too vibrant for your preference or need, choose the Desaturate option and follow the same procedures as outlined above.
Desaturation Example:
The Sponge Tool is not only helpful on photographs, but also on all different types of images.
Let’s desaturate this vehicle just a bit. Grab the Sponge Tool, set your options, and brush on the object of your choice until you get the result you are looking for.
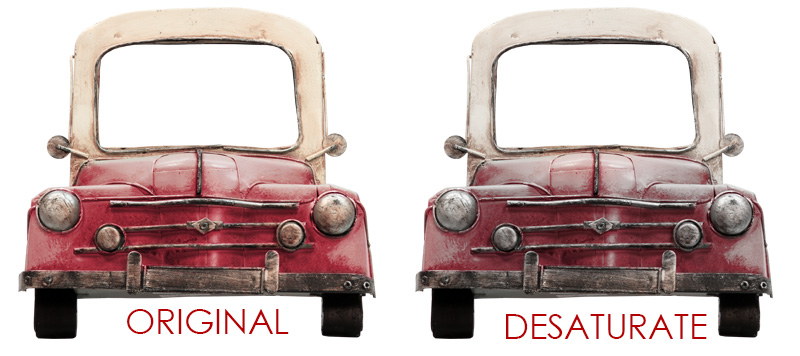
Conversely, if you wanted the vehicle more saturated, you would follow the same steps using the Saturation option.
Whether you want to saturate or desaturate an image, whether you are working on a photograph or graphic elements, the Sponge Tool can be a quick go-to source. Remember to tuck away your original photo, work on a duplicate, and then experiment.
If you click too many times on your image and don’t like the result, just hit Control + Z to Undo, or visit your documents history state to step back to the point where you like the image.
That’s all there is to it!
Credits: The photograph used in this tutorial is courtesy of my daughter-in-law, who is pictured holding the baby (my newest grandchild, Ella). The vehicle used in the desaturation example is included in my newest Collection, Pumpkin Patch.
If you would like to keep this tutorial on your computer for easy reference, you may download a PDF here: How to Use the Sponge Tool in Photoshop and Photoshop Elements.
DeLoris created this beautiful Pumpkin Patch cluster for you to practice your Sponge Tool skills on. Just click on the preview to download.
 See you next week!


In the PSE photo it’s not the sponge tool you are showing … it’s the burn tool and the options in the sponge tool are different …. saturate and desaturate only with the brush size and flow …. lol … it happens 🙂 … thanks for the follow up on the burn tool last week
Yep, you’re right. I’ve made the image correction. Thanks, Su.
[…] How to Use the Sponge Tool in Photoshop – 3 freebie(s) […]
So, THAT’s what it is used for! Huh! I’ve played around with it in trying to blend things together, but, I had no idea what it was meant to do. I’ve yet to try all the tools! I have so much still to learn! LOL So, a ‘spot’ de-saturator/saturator! Who knew? Well, you, obviously! LOL
Thank you, ma’m!
Su
Well I learned something new today! Always wondered about the ins and outs of the sponge tool. Thanks so much for explaining. Love to learn all the tips I can about the various tools in PS.
Karen, thanks for the gorgeous cluster! (love the kit) I had never heard of the sponge tool. Thanks again for teaching me something new!
Another tool, I tried and nothing happened!!!!! it must have, but I didn’t realise LOL. but now I know what it actually does, wonderful, thank you Karen I am learning so much with your tutorials.
What a wonderful tool–to get JUST the right “feel” for a layout. Thanks for the in-depth look at what the lil-ole sponge can do.
Thank you so much for this tutorial and especially a big thank you for the PDF file for downloading. Thanks too for the Pumpkin Patch cluster.
Thanks, all, for letting me know you have found this little tool helpful. Su, I like your definition of a “spot” saturation/desaturation tool…. It definitely can be used like that… or as much as you like (in a brushing motion). Very cool tool indeed! 🙂
Thank you! I always wondered, but never took time to play with the sponge tool! Wonderful to know.
Thank you!! I was always afraid of the sponge tool since I didn’t understand it.
Thanks, Nancy, for letting me know, and for your comments in the Surprise Me Border challenge regarding your experience with this tool.